
|
Do it yourself
| |||
| ||||


How to Change the Rear Lights on a Volkswagen Golf VI
Model: Volkswagen Golf
MK 6, Golf VI, Golf 6, 5K1
- Years 2008-2012
In this video, you will learn how to replace the rear lights on a Volkswagen Golf VI with R20 lights featuring dynamic indicators. You can find them on Amazon with the code B08NPNPLV4 for £299, including delivery charges. To start, open the boot and disconnect the connector from the inside, then undo the support spring located next to it. Before fitting the new light, connect the control unit to avoid errors on the instrument cluster, ensuring it is positioned to prevent water ingress. Now, position the light and pass the connectors through the bodywork hole, then connect it from the inside and tighten the support spring. Repeat the process on the other side. Next, we need to install the lights on the moving part of the tailgate: remove the side cover, disconnect the connector, and take out the light; when fitting the new one, insert the control unit first, as with the other side, followed by the light; connect the connector and replace the cover, then repeat on the other side.
Updated on 2 August 2026 by ScegliAuto
Video tutorial
Related tutorials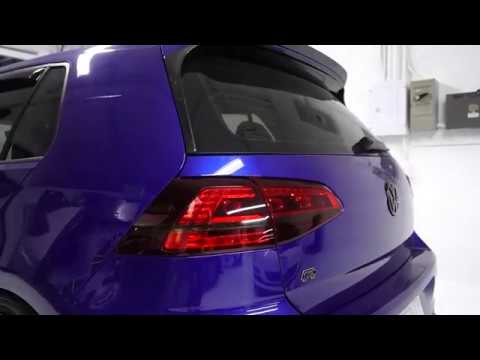
Volkswagen Golf
(2012-2019 /
Golf VII, MK 7, Golf 7)
If you find that the white strip on the rear lights of your Volkswagen Golf stands out a bit, you can make it less visible aesthetically (but you won…

Volkswagen Golf
(2012-2019 /
Golf VII, MK 7, Golf 7)
In this tutorial, we will see how to disassemble the rear lights on a Volkswagen Golf, a very simple and quick operation. First of all, let's make su…

Volkswagen Golf
(2012-2019 /
Golf VII, MK 7, Golf 7)
In this guide, you will find instructions for removing and replacing the rear lights on a Volkswagen Golf. First, open the tailgate and start by remo…
Other guides you may be interested in
|
How to Connect the Cables to the Battery of the Citroen Xsara Picasso?
In this tutorial, you will see how to connect the cables to the battery of the Citroen Xsara Picasso, useful if you need to recharge it or perform an emergency start. First, ensure the key is not inserted, then open the bonnet and move to the front of the left headlamp. Next, locate the bolt just behind the filter box and connect the positive terminal clamp to it. Now you can connect the negative terminal to any point on the chassis, such as the indicated point. Once the operation is complete, ensure you disconnect the negative first and then the positive. by ScegliAuto More videos
|
|
For advertising on this site Write to info@scegliauto.com
ScegliAuto is not responsible for any inaccuracy of the data in the lists. To report any inaccuracy or your business (if you own the business in question), please write to info@scegliauto.com
Number of seconds to generate the page: 0.321
(c) ScegliAuto 2026 - info@scegliauto.com - Privacy policy VAT number: IT01247470535 |
