
|
Do it yourself
| |||
| ||||


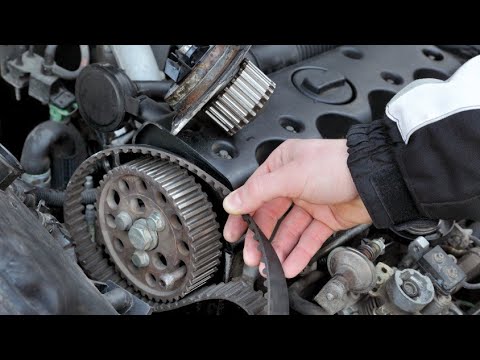
Guide to replacing the timing belt of the Audi A4 2.0 TDI
Model: Audi A4
B8
- Years 2007-2016
Today we will see, in this short and simple guide, the main instructions that will allow us to remove and replace the timing belt of the Audi A4, with 2.0 TDI engine. First we open the engine hood and start by removing the upper plastic protection; we unscrew all the fixing screws of the front bumper, in order to unhook and remove it. At this point we are going to disassemble the radiator and the intercooler, also removing the fan; to do this we disconnect the electrical connector and unscrew the screws. We remove the timing cover later to replace the belt!
Posted on 25 March 2022 by ScegliAuto
Video tutorial
Related tutorials
Audi A4
(2007-2016 /
B8)
In this guide, we will see the useful information for replacing the timing belt of the Audi A4 2.0 TDI; the manufacturer declares that, on this type …
Audi A4
(2007-2016 /
B8)
Below we will discover the information that will allow us to disassemble and replace the timing belt of the Audi A4 2.0 TDI. First, we open the hood …

Audi A4
(2007-2016 /
B8)
The instructions in this guide will show us how to disassemble and replace the timing belt of the Audi A4 2.0 TDI. To access the timing belt, it is n…
Other guides you may be interested in
|
Frequently Asked QuestionsHow to Replace the Number Plate Bulb on Citroen C3
To replace the number plate bulb on a Citroen C3, use a screwdriver or plastic lever to remove the light cover (plastic housing) located in the rear bumper of the car. Once the light cover is removed, extract the bulb holder (using your hands), then disconnect the bulb from it. Fit the new LED bulb (same size and voltage) into the holder, then refit the light cover into the tailgate metal by pressing until the clips lock automatically. Test the correct operation of the previously installed bulb. by ScegliAuto More videos
|

|
For advertising on this site Write to info@scegliauto.com
ScegliAuto is not responsible for any inaccuracy of the data in the lists. To report any inaccuracy or your business (if you own the business in question), please write to info@scegliauto.com
Number of seconds to generate the page: 0.104
(c) ScegliAuto 2026 - info@scegliauto.com - Privacy policy VAT number: IT01247470535 |