
|
Do it yourself
| |||
| ||||


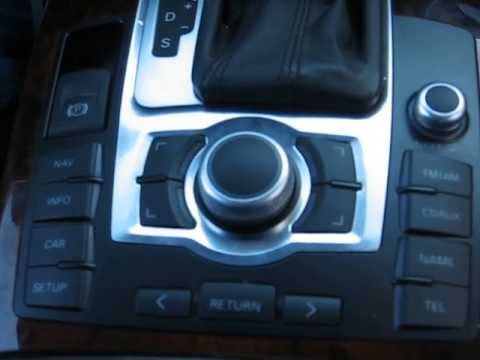
Central Tunnel Console Disassembly Instructions
Model: Audi A6
C6, MK 3
- Years 2004-2012
To disassemble the central tunnel console, gather some tools such as plastic pry tools or wire hooks. Start by removing the side panels covering the tunnel, then extract the rear air vents using the wire hooks and unscrew the armrest mounting bolt so it can be removed. Take off the cover from the bottom of the cup holder, unscrew the corresponding mounting screw, and remove the cup holder itself to continue disassembling the other screws and remove the rear portion of the tunnel. At this point, detach the cover of the gear shift lever, unscrew the mounting screws of the frame around the gear shift lever and those under the ashtray to complete the disassembly of the frame by disconnecting the connectors from the switch panel and the cigarette lighter. You can now unscrew the mounting screws of the ashtray and the switch panel on the central tunnel console, which can only be removed after taking off the chrome frame in the center (be careful with the mounting tabs). Once the switch panel is removed, disassemble the handbrake button and proceed in reverse for reassembly.
Updated on 14 February 2026 by ScegliAuto
Video tutorial
Related tutorials
Audi A6
(2011-2018 /
C7, MK 4)
Today we will discover the instructions that will allow us to disassemble and remove the central tunnel of the Audi A6, in simple steps. First of all…
Audi A6
(2004-2012 /
C6, MK 3)
Let's see how to disassemble and remove the electric parking brake button placed on the lining of the central tunnel of an Audi A6: we bring the gear…

Audi A6
(2004-2012 /
C6, MK 3)
The following steps will show us how to disassemble the console and the central tunnel of the Audi A6. First, we get inside the cabin and start remov…
Other guides you may be interested in
|
How to Remove the Center Console on a Mercedes C-Class
Let's see how to remove the center console on a Mercedes C-Class. Use a plastic trim tool to pry off the cover located at the bottom of the center console. Remove the leather shift boot along with its plastic frame. After removing the cover, unscrew the fastening screws located at the top of the center console with a screwdriver. Once this is done, pull the console away and disconnect the power cables for the knob. Finally, insert the new piece into the center console area and reassemble all the components of the glove compartment as you disassembled them earlier. by ScegliAuto More videos
|
|
For advertising on this site Write to info@scegliauto.com
ScegliAuto is not responsible for any inaccuracy of the data in the lists. To report any inaccuracy or your business (if you own the business in question), please write to info@scegliauto.com
Number of seconds to generate the page: 0.223
(c) ScegliAuto 2026 - info@scegliauto.com - Privacy policy VAT number: IT01247470535 |