
|
Do it yourself
| |||
| ||||


|
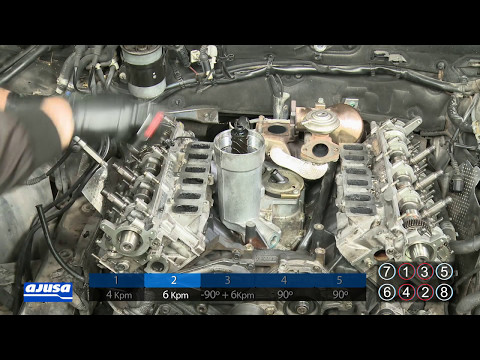
Replacing the cylinder head gasket involves several critical steps during the engine assembly phase. Ensure to replace the gaskets, oil seals, and fastening pins. After machining the cylinder head surface, check its flatness using a straightedge and a feeler gauge (perform the same operation on the cylinder block). Proceed to replace the valve guide seals using a special valve spring compressor to release the return springs. Then, install the new camshafts by inserting a new set of pins for the valve rocker assembly and generously lubricate the sliding surfaces, ensuring to maintain the timing references. Install the exhaust manifolds with new gaskets, re-tap the threads of the cylinder head mounting holes on the cylinder block, check the piston interference with a digital height gauge, and apply the new cylinder head gasket. Position the cylinder heads, apply copper grease under the head and on the bottom of the thread of the new set of pins, and tighten them in a cross pattern using a torque wrench and a regular wrench. Verify that the turbine impeller has no play, apply the three new dowel pins, the new gaskets, and the lubrication duct, then install it on the exhaust manifold. Next, insert the camshaft oil seals, the timing pulleys, and the timing belt, always keeping the timing references. Finally, install the valve covers by applying gasket sealer on the edges before inserting the new gaskets and covers, along with the intake manifolds.
Updated on 15 February 2026 by ScegliAuto
Video tutorial
Related tutorials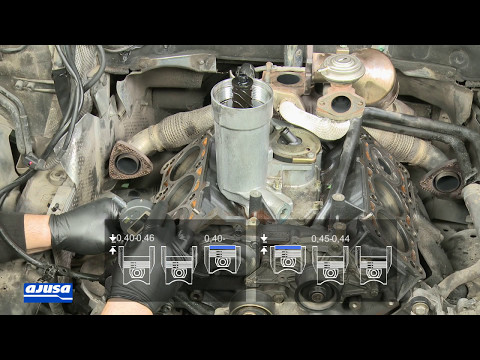
Audi A6
(1997-2004 /
MK 2, C5)
When disassembling the engine for head gasket replacement, observe several precautions during reassembly. First, check the flatness of the surfaces (…
Audi A6
(1997-2004 /
MK 2, C5)
When replacing the cylinder head gasket, it is good practice to use a new set of fastening pins for the cylinder head. Start by cleaning the threaded…

Audi A6
(1997-2004 /
MK 2, C5)
When rebuilding an engine, for example due to a head gasket sealing issue, it is good practice to replace all gaskets during the assembly phase after…
Other guides you may be interested in
|
How to Replace the Remote Battery for the Volvo XC40?
In this tutorial, you will see how to replace the battery in the remote for the Volvo XC40, a very simple and quick operation. For this, you will need a replacement battery of type CR2032 and possibly a small flathead screwdriver. First, remove the front cover by pressing the button on the metal ring, then locate the second button, press it as well, and remove the opposite cover. Next, open the circular cap, take out the old battery, and insert the new one in the opposite direction. Finally, reassemble everything. by ScegliAuto More videos
|
|
For advertising on this site Write to info@scegliauto.com
ScegliAuto is not responsible for any inaccuracy of the data in the lists. To report any inaccuracy or your business (if you own the business in question), please write to info@scegliauto.com
Number of seconds to generate the page: 0.246
(c) ScegliAuto 2026 - info@scegliauto.com - Privacy policy VAT number: IT01247470535 |
