
|
Do it yourself
| |||
| ||||


Chrysler Pt Cruiser - Video tutorial
Model: Chrysler Pt Cruiser
MK 1
- Years 2000-2010 If a repair has been carried out that required draining the engine coolant (such as replacing the water pump or radiator), it will be necessary to refill the refrigeration system with suitable antifreeze liquid, paying particular attention so that no air bubbles form in the circuit; once the coolant mixture has been prepared (you can also choose a ready-to-use mixture), apply a tube to the drain valve located immediately under the filler cap and open it, starting to fill the circuit slowly: you will notice bubbles coming out; at the end of filling, start the engine by activating the passenger compartment heating so that the liquid circulates throughout the system and check the level again.
Posted on 31 August 2023 by ScegliAuto
 Disassembly of the Crysler Pt Cruiser water pump
Chrysler Pt Cruiser (2000-2010 / MK 1) In this video tutorial we will see the main steps to be able to disassemble the water pump of a Crysler Pt Cruiser. To do this we are going to disass 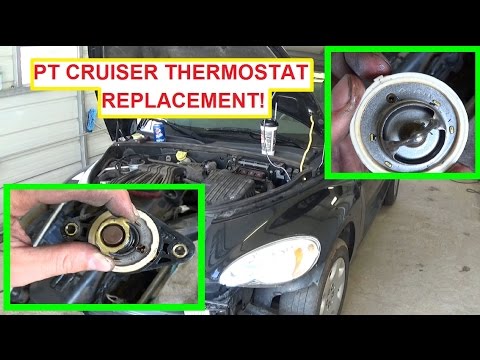 Thermostatic valve replacement
Chrysler Pt Cruiser (2000-2010 / MK 1) The thermostatic valve has the function of activating itself when the temperature of the coolant in the engine exceeds 90 degrees and opens to exchan 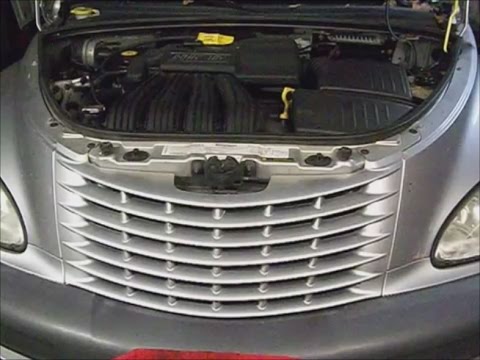 How to disassemble the cooling radiator on Chrysler Pt Cruiser
Chrysler Pt Cruiser (2000-2010 / MK 1) Let's see how to disassemble the cooling radiator on Chrysler Pt Cruiser. We open the engine hood, disassemble the front bumper (if necessary for dis Other guides that may interest you
|
How do you replace the horn on the Citroà «n Berlingo?
In order to replace the horn on the Citroà «n Berlingo, the vehicle must be raised so that the screws that secure the left front wheel can be loosened and removed completely. Once this wheel has been removed, it will be possible to access the screws that secure the internal cover of the corresponding wheel arch: this will have to be detached and it will be possible to access the components inside, including the horn. This will need to be disconnected from its connector and removed from its holders, so that it can be replaced with a new spare part. by ScegliAuto More videos
|
|
For advertising on this site Write to info@scegliauto.com
ScegliAuto is not responsible for any inaccuracy of the data in the lists. To report any inaccuracy or your business (if you own the business in question), please write to info@scegliauto.com
Number of seconds to generate the page: 0.035
(c) ScegliAuto 2024 - info@scegliauto.com - Privacy Policy VAT number: IT01247470535 |