
|
Do it yourself
| |||
| ||||


How to reset the service in the Citroen DS3?
Model: Citroen Ds3
MK 1
- Years 2010-2019
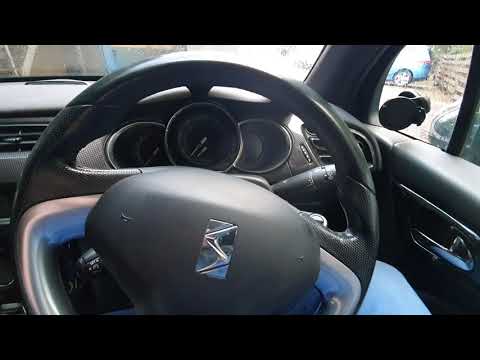
In this tutorial we can see how to reset the service in the Citroen DS3, an extremely simple and quick operation, to be carried out only once all scheduled maintenance work has been completed. First of all, let's go inside the cabin, then insert the key but leave it in the initial position. Next, press the button in the center of the dashboard, simultaneously turn on the instrument panel and keep the button pressed for the entire duration of the countdown that appears on the right display. Finally, complete the reset by restarting the vehicle.
Posted on 20 June 2024 by ScegliAuto
Video tutorial
Related tutorials
Citroen Ds3
(2010-2019 /
MK 1)
If you have recently had the regular service of your Citroen DS3, but the "Service" message continues to appear on the instrument panel, then you nee…

Citroen Ds3
(2010-2019 /
MK 1)
The service light reset of the Citroen DS3 is a very simple operation to perform independently. We remind you to perform this operation only after co…
Citroen Ds3
(2010-2019 /
MK 1)
Performing a service light reset on a first-generation Citroen DS3 (2010-2019) is a very simple and quick operation, as shown in today's video tutori…
Other guides you may be interested in
|
Installation of Upgraded Intercooler Radiator with Pipes
Lift the vehicle on suitable axle stands, remove the front wheels, and then the front bumper and grille. Proceed to remove the front headlights; drain the coolant, remove the intercooler radiator and the hoses connecting it to the intake system. Position the new intercooler radiator in the grille, temporarily securing it with cable ties, and mark with a marker the part of the metal that needs to be removed to allow the new hoses to pass through. Cut the marked portion of metal and apply a gasket to the edge. Remove the inner cover of the bumper and position it near the radiator to identify any interfering parts to eliminate: again, apply a gasket to the edge of the cut. Create brackets for securing the new radiator and proceed with the installation of the connecting pipes from the radiator to the intake, shaping and connecting them appropriately. Finally, reassemble the bumper, headlights, and grille. by ScegliAuto More videos
|

|
For advertising on this site Write to info@scegliauto.com
ScegliAuto is not responsible for any inaccuracy of the data in the lists. To report any inaccuracy or your business (if you own the business in question), please write to info@scegliauto.com
Number of seconds to generate the page: 0.099
(c) ScegliAuto 2026 - info@scegliauto.com - Privacy policy VAT number: IT01247470535 |