
|
Do it yourself
| |||
| ||||


To perform a service reset on a Mini Cooper F, follow these steps:
Model: Mini Mini
F57, F56, F55, F54
- Years 2014-2023
In this very short video guide today, we are shown the entire process necessary to reset the service light on our Mini Cooper F, a model produced from 2014 until 2023. As shown in the video, first, we turn on the car's dashboard but without starting the engine and wait for the end of the dashboard check. Then we press and hold the button on the speedometer until we enter the service menu. Once we've done that, we use the speedometer button again to select the option for the service light and hold it down until we receive the reset notification. Finally, we confirm the reset to complete the job.
Posted on 10 May 2023 by ScegliAuto
Video tutorial
Related tutorials
Mini
(2014-2023 /
F57, F56, F55, F54)
In this tutorial, you will see how to reset the service in the Mini Cooper, a very simple and quick operation to be performed only after completing a…

Mini
(2014-2023 /
F57, F56, F55, F54)
In this tutorial we can see how to reset the service in the Mini Cooper S, an extremely simple and quick operation, to be carried out only after comp…

Mini
(2007-2014 /
R56, R57, R55)
In this video we will see how to reset the service in the second series of the Mini Cooper born under the aegis of BMW, or rather the R56 series. We …
Other guides you may be interested in
|
Removing the Front Arm Bushing of a Hyundai Getz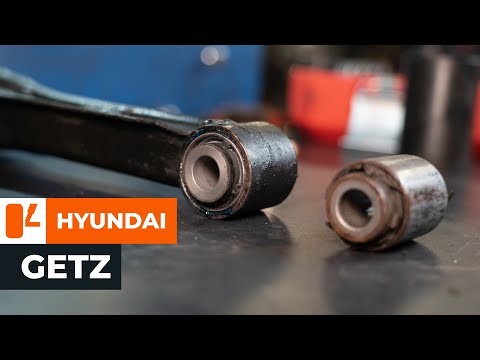
Let's look at removing the front arm bushing of a Hyundai Getz. First, place the car on a column lift and loosen the wheel nuts with a telescopic spanner, then remove the wheel. Use a socket spanner to unscrew the lower securing bolt of the arm and the bolt mounted under the wheel hub, then unscrew the bolts on the upper part of the arm (as shown in the video). Remove the bushing from the bolt housing. Always compare the parts to be replaced with the new ones; if they are suitable, you can install them. Start the installation of the new part: fit the new bushing and tighten all bolts to the specified torque. Double-check the correct tightening of the parts. Refit the wheel to complete the job. by ScegliAuto More videos
|

|
For advertising on this site Write to info@scegliauto.com
ScegliAuto is not responsible for any inaccuracy of the data in the lists. To report any inaccuracy or your business (if you own the business in question), please write to info@scegliauto.com
Number of seconds to generate the page: 0.419
(c) ScegliAuto 2026 - info@scegliauto.com - Privacy policy VAT number: IT01247470535 |