
|
Do it yourself
| |||
| ||||


How to Change the Battery on a Renault Clio II
Model: Renault Clio
Clio 2, MK 2
- Years:
1998, 1999, 2000, 2001, 2002, 2003, 2004, 2005
Video tutorial
To change the battery on a Renault Clio II, open the bonnet and locate the battery. Always disconnect the negative black terminal first to avoid accidental short circuits. Then disconnect the positive red terminal. Loosen the bolts or nuts securing the bracket holding the battery, then carefully lift it out. Do not hold the battery against your body while handling it: it contains sulphuric acid, which is corrosive. Wear gloves and protective eyewear if possible. Place the new battery in the housing, ensuring the terminals are oriented correctly (positive and negative in the same position as the old one). Secure the holding bracket. Always reconnect the positive terminal first, then the negative terminal. Tighten the terminals well, but do not overtighten to avoid damaging them. Finally, check that everything is secure and start the engine.
Posted on 28 September 2026 by ScegliAuto
Related tutorials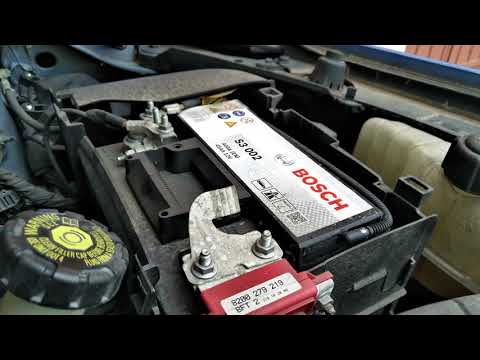
Renault Clio
(2005-2013 /
Clio III, MK 3, Clio 3)
To change the battery in the Renault Clio III, open the bonnet of the vehicle, remove the battery cover, and disconnect the negative terminal (the bl…

Renault Clio
(2019-2026 /
Clio V, Clio 5)
To change the battery inside your Renault Clio fifth series key by yourself, follow the procedure described in this new guide. First, take the key an…

Renault Clio
(2012-2019 /
MK 4, Clio IV, Clio 4)
To open the key fob of a Renault Clio and remove or change the battery, first remove the key blade by pressing the button on the side of the fob and …
ScegliAuto offers an extensive international collection of automotive tutorials available in 12 languages. Each guide combines instructional videos with original explanations written by experienced human editors, along with information about the car models covered.
Other guides you may be interested in
|
How to Reset the Tyre Pressure Warning Light on the Jeep Compass?
To reset the tyre pressure warning light on the Jeep Compass, inflate all tyres to the correct pressure value, which is indicated on the sticker affixed to the driver’s door pillar. Once all tyres are at this pressure, switch on the ignition and press and hold the corresponding button located to the left of the steering wheel. This will turn off the warning light, but to prevent it from reactivating, you must reset the system using an OBD scanner connected to the designated port. by ScegliAuto More videos
|
|
For advertising on this site Write to info@scegliauto.com
ScegliAuto is not responsible for any inaccuracy of the data in the lists. To report any inaccuracy or your business (if you own the business in question), please write to info@scegliauto.com
Number of seconds to generate the page: 0.058
(c) ScegliAuto 2026 - info@scegliauto.com - Privacy policy - About us VAT number: IT01247470535 |
