
|
Do it yourself
| |||
| ||||


Removing the door panel on Renault Megane
Model: Renault Megane
Megane 3, Megane III
- Years 2008-2015
Remove the internal triangular plastic at the height of the mirror, then remove the handle protection, both using a plastic lever, and unscrew the two screws uncovered so far. Then, unscrew the screw on the side of the panel (the one that can only be accessed by opening the door) and those below it. Remove the screw cover near the opening handle and you will have found another screw to remove. Remove the low door bulb and disconnect its connector, then remove the panel by hand or with the help of the lever again.
Posted on 16 January 2022 by ScegliAuto
Video tutorial
Related tutorials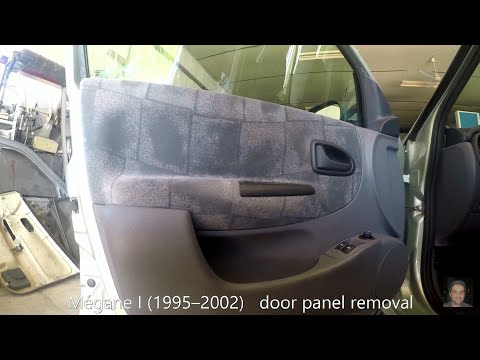
Renault Megane
(1995-2003 /
Megane 1)
So let's start by going to open the front door of our Renault Megane. Once this is done, we will have to proceed by removing the internal opening han…
Renault Megane
(1995-2003 /
Megane 1)
Before we can start, we will have to go and open the front door of our Renault Megane. So let's start by unscrewing and removing the screw that fixes…
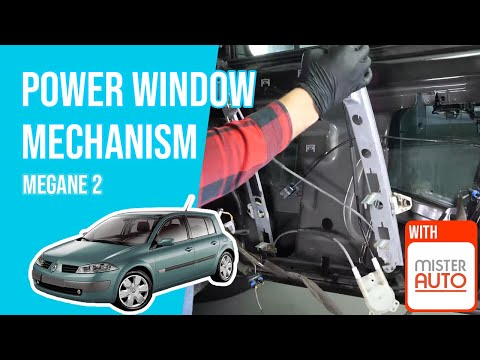
Renault Megane
(2002-2010 /
Megane 2)
Before starting, we will have to open the door of our Renault Megane. So let's start by disengaging and removing the door panel insert with its power…
Other guides you may be interested in
|
Removing and Replacing a Front Headlamp of a Lancia Lybra
This video explains how to remove and replace the front headlamp and its bulbs on a Lancia Lybra. The car has a very simple and quick headlamp removal system. To start, lift the bonnet, reach into the engine bay, and (specifically at the rear of the headlamp) unclip the metal tab that secures the headlamp, then use a screwdriver to undo the few Torx screws. After removing the screws, unclip the headlamp and pull it out from the bumper, disconnect the power connectors, and replace any damaged bulbs or the entire unit. The reassembly phase is very straightforward: insert the headlamp into the bumper housing as shown in the video, secure the metal tab until the headlamp clicks into place (screw in the securing screws). Finally, test the correct operation of the lights. by ScegliAuto More videos
|
|
For advertising on this site Write to info@scegliauto.com
ScegliAuto is not responsible for any inaccuracy of the data in the lists. To report any inaccuracy or your business (if you own the business in question), please write to info@scegliauto.com
Number of seconds to generate the page: 0.048
(c) ScegliAuto 2026 - info@scegliauto.com - Privacy policy VAT number: IT01247470535 |