
|
Do it yourself
| |||
| ||||


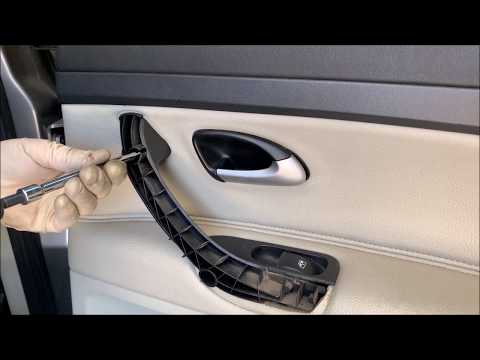
Removing the Front Door Panel
Model: Saab 9 3
MK 2
- Years 2002-2014
It is advisable to disconnect the battery before proceeding with the removal. First, detach the handle cover to access the screws underneath; use a spatula to unclip the pressure clips along the edges of the panel: once unclipped, disconnect the opening lever cable and the connectors attached to the switch panel (they have a bayonet lock).
For reassembly, proceed in reverse order by first connecting the plugs to the corresponding terminals, then the opening lever cable, and reposition the panel ensuring the pressure clips fit into their respective holes; finally, insert the screws and the handle cover.
Updated on 6 February 2026 by ScegliAuto
Video tutorial
Related tutorials
Saab 9 3
(2002-2014 /
MK 2)
This tutorial explains the operation of the rear door opening mechanism of a Saab 9-3. The various steps allow you to dismantle the door opening modu…
Saab 9 3
(2002-2014 /
MK 2)
Start by disconnecting the battery terminals in the engine bay. Use a screwdriver to unscrew the screws located in the handle area (after removing th…
Saab 9 3
(2002-2014 /
MK 2)
Remove the door panel (rear right) on a Saab 9 3: disconnect the battery terminals located in the engine bay, remove the plastic covers from the hand…
Other guides you may be interested in
|
How to Reset Service Light on Fiat 500L
How to remove the service light on a Fiat 500L? Let's see how to do it. Enter the vehicle and turn on the instrument panel. Press the accelerator pedal six times in a row, then release the pedal. Turn off the instrument panel and remove the key from the ignition. Reinsert the key and turn on the instrument panel, then wait for it to illuminate. Check the changes made to the car and see if the light has disappeared. Always remember to carry out onboard computer modifications with the engine off. Perform the reset safely. by ScegliAuto More videos
|
|
For advertising on this site Write to info@scegliauto.com
ScegliAuto is not responsible for any inaccuracy of the data in the lists. To report any inaccuracy or your business (if you own the business in question), please write to info@scegliauto.com
Number of seconds to generate the page: 0.115
(c) ScegliAuto 2026 - info@scegliauto.com - Privacy policy VAT number: IT01247470535 |