
|
Do it yourself
| |||
| ||||


Affordable Solutions to Repair a Sagging Car Headlining
Model: (Various brands) Various
If the headlining of your older car has sagged, there are a few affordable solutions: the first is to use office pins or screws with washers (not the prettiest solution), at virtually no cost; the second, which is better if done with a bit of care, involves using covered buttons that can be easily found on e-commerce platforms, such as Amazon with code B0CRYT3DZC, where the entire kit costs £11.89 with free delivery. A third solution involves removing the upholstery, completely scraping it off the roof, cleaning everything well, and leaving it in a raw state: if you want to improve it a bit, you could paint it. It may not be beautiful, but at least it will be clean and tidy.
Posted on 30 January 2026 by ScegliAuto
Video tutorial
Related tutorials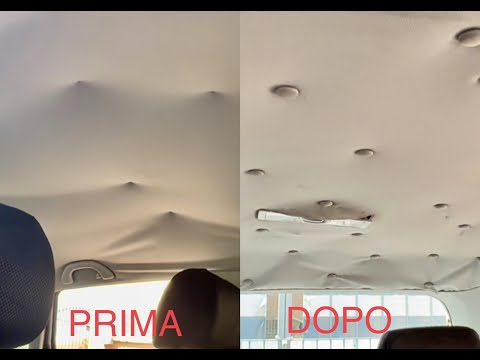
(Various brands) Various
The detached sky, or rather the detached upholstery that covers the roof of the car, is really unsightly. How can it be repaired without excessive co…
(Various brands) Various
In this video tutorial, the three things not to do if the car roof fabric (headliner) has come off are explained. The first thing not to do is not to…

(Various brands) Various
We see in this video one of the many options or roads that we can take to be able to repair the most common damage caused, for example, by the hail o…
Other guides you may be interested in |
Installation of Upgraded Intercooler Radiator with Pipes
Lift the vehicle on suitable axle stands, remove the front wheels, and then the front bumper and grille. Proceed to remove the front headlights; drain the coolant, remove the intercooler radiator and the hoses connecting it to the intake system. Position the new intercooler radiator in the grille, temporarily securing it with cable ties, and mark with a marker the part of the metal that needs to be removed to allow the new hoses to pass through. Cut the marked portion of metal and apply a gasket to the edge. Remove the inner cover of the bumper and position it near the radiator to identify any interfering parts to eliminate: again, apply a gasket to the edge of the cut. Create brackets for securing the new radiator and proceed with the installation of the connecting pipes from the radiator to the intake, shaping and connecting them appropriately. Finally, reassemble the bumper, headlights, and grille. by ScegliAuto More videos
|
|
For advertising on this site Write to info@scegliauto.com
ScegliAuto is not responsible for any inaccuracy of the data in the lists. To report any inaccuracy or your business (if you own the business in question), please write to info@scegliauto.com
Number of seconds to generate the page: 0.073
(c) ScegliAuto 2026 - info@scegliauto.com - Privacy policy VAT number: IT01247470535 |