
|
Do it yourself
| |||
| ||||


Review of the leather steering wheel for Audi from China.
Model: Audi A3
MK 3, 8V
- Years 2012-2019
In this video, we see a review of a steering wheel purchased by the YouTuber two years ago, which has proven to be very reliable over time. He admits to being a person who doesn't wear rings or bracelets that could damage the steering wheel's surface, only wearing his wedding band and watch, which is definitely a point in his favor. However, after two years of continuous use, the steering wheel is still in impeccable condition. We can find the steering wheel, complete with buttons, on AliExpress under the code 1005008261150903 for the price of €365.92, with free shipping. If we prefer it without buttons, the code is 32960920030 for the price of €199.39, also with free delivery.
Posted on 2 January 2026 by ScegliAuto
Video tutorial
Related tutorials
Audi A3
(2012-2019 /
MK 3, 8V)
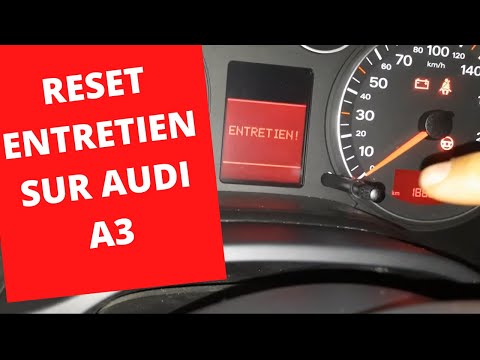
After performing the oil change and oil filter replacement, it is necessary to reset the indicator light. On a 2018 Audi A3 vehicle, to perform this …

Audi A3
(2012-2019 /
MK 3, 8V)
On the Audi A3, all the fuses are contained within the appropriate fuse boxes that are installed on the vehicle: in this type of car, it is possible …
Audi A3
(2003-2013 /
8P, MK 2)
Resetting the service indicator of the Audi A3 is a very simple operation, easily performed completely autonomously. Let's begin by entering the vehi…
Other guides you may be interested in
|
Installation of Upgraded Intercooler Radiator with Pipes
Lift the vehicle on suitable axle stands, remove the front wheels, and then the front bumper and grille. Proceed to remove the front headlights; drain the coolant, remove the intercooler radiator and the hoses connecting it to the intake system. Position the new intercooler radiator in the grille, temporarily securing it with cable ties, and mark with a marker the part of the metal that needs to be removed to allow the new hoses to pass through. Cut the marked portion of metal and apply a gasket to the edge. Remove the inner cover of the bumper and position it near the radiator to identify any interfering parts to eliminate: again, apply a gasket to the edge of the cut. Create brackets for securing the new radiator and proceed with the installation of the connecting pipes from the radiator to the intake, shaping and connecting them appropriately. Finally, reassemble the bumper, headlights, and grille. by ScegliAuto More videos
|

|
For advertising on this site Write to info@scegliauto.com
ScegliAuto is not responsible for any inaccuracy of the data in the lists. To report any inaccuracy or your business (if you own the business in question), please write to info@scegliauto.com
Number of seconds to generate the page: 0.065
(c) ScegliAuto 2026 - info@scegliauto.com - Privacy policy VAT number: IT01247470535 |