
|
Do it yourself
| |||
| ||||


Fuel pump disassembly on BMW 3
Model: BMW Serie 3
E91, E90, E92
- Years 2005-2013
How to disassemble the fuel pump? We see the disassembly of the pump from inside the tank of a BMW e. We disassemble the rear seats, find the tank lid. Unscrew the tightening screws of the metal cap (if present) with a socket wrench, remove it from its seat, cover the perimeter with absorbent paper to stop liquid leaks. We disconnect the power supply terminals and the liquid circulation tubes, unscrew the large plastic nut. We extract the floating fuel pump from its seat with attached pieces. We replace the damaged part with a new one.
Posted on 19 December 2020 by ScegliAuto
Video tutorial
Related tutorials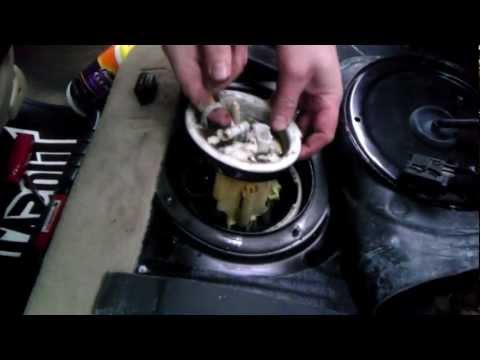
BMW Serie 3
(1998-2006 /
E46)
Today, in this video tutorial, we will see how to disassemble the fuel pump of a BMW 3 Series. First we open the boot lid and remove the lining that …

BMW Serie 3
(1998-2006 /
E46)
These brief and simple instructions will show us the main steps on how to disassemble and replace the fuel pump of the BMW 3 Series 325i. First, we o…

BMW Serie 3
(1998-2006 /
E46)
Today in this guide, we will see the main instructions useful for disassembling and replacing the fuel pump of the BMW 3 Series. First, we open the r…
Other guides you may be interested in
|
Removing the Timing Belt on a Suzuki Vitara
In this video, see the removal and replacement of the timing belt and water pump on a Suzuki Vitara. Open the bonnet and lift it, securing it in place. Use a socket wrench to remove the cooling radiator along with the associated hoses. Disconnect the power wiring using pliers, and remove the plastic undertray with a screwdriver. Use a spanner to loosen the tensioner pulley and slide the belt off its seat. Use a socket wrench to unscrew the tensioner pulley bolt, and remove the water pump as shown in the video. Fit the new water pump, the tensioner, and the belt itself, tightening everything with the socket wrench. Finally, reinstall the radiator with the securing bolts. by ScegliAuto More videos
|

|
For advertising on this site Write to info@scegliauto.com
ScegliAuto is not responsible for any inaccuracy of the data in the lists. To report any inaccuracy or your business (if you own the business in question), please write to info@scegliauto.com
Number of seconds to generate the page: 0.069
(c) ScegliAuto 2026 - info@scegliauto.com - Privacy policy VAT number: IT01247470535 |