
|
Do it yourself
| |||
| ||||


Chrysler Pt Cruiser - Video tutorial
Model: Chrysler Pt Cruiser
MK 1
- Years 2000-2010 In order to remove the rear bumper it is first necessary to remove the plastic wheel arches from under the rear mudguards (the operation is easier if the rear wheels are also removed but you can do without them) by removing the relative pressure locks. plastic; at this point it is possible to access the fixing pins of the bumper to the edge of the mudguard: these are self-tapping screws with a 7 mm head; therefore open the rear lid, remove the gasket at the base of the closing line and unhook the luggage cover; remove the protective tape in front of the access holes of the other bumper fixing nuts (one in the center and two on the sides) and remove them; then unhook the two side spotlights and the license plate lights in order to complete the disassembly.
Posted on 19 August 2023 by ScegliAuto
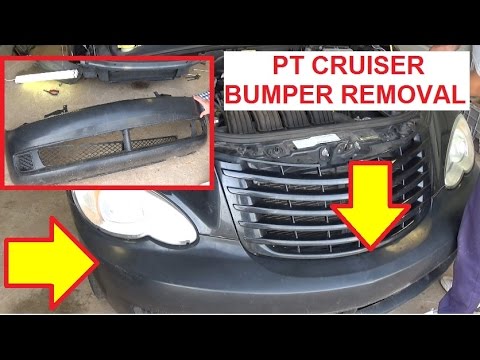 Front bumper removal instructions
Chrysler Pt Cruiser (2000-2010 / MK 1) The disassembly of the front bumper is extremely simple to carry out: it is a matter of unscrewing the relative fixing screws; start by opening the f 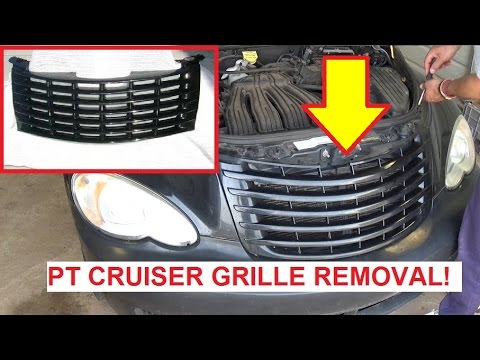 Front grill disassembly instructions
Chrysler Pt Cruiser (2000-2010 / MK 1) The front grille integrated in the front bumper is fixed to the bonnet bumper with two screws for each end and then wedged along the edges to the bum  How to replace Chrysler Pt Cruiser headlight bulbs
Chrysler Pt Cruiser (2000-2010 / MK 1) As a first operation, unhook the hood from the special lever and lift it, now you will have to remove the bolts indicated in the video on the upper p Other guides that may interest you
|
How to set the clock on the Yamaha Xmax 300
To change the time of the Yamaha Xmax 300, keep the "trip" button pressed, at the same time turn the ignition to "on"; release the "trip" button when the time starts flashing; briefly press the "trip" button to set the time; press and hold for a few seconds to confirm and move on to the minutes; briefly press the same button to set the minutes; we long press the same "trip" button to confirm; at this point in the meantime that we hold down the minutes stop flashing the time has been saved correctly and we can turn off the instrument panel. by ScegliAuto More videos
|
|
For advertising on this site Write to info@scegliauto.com
ScegliAuto is not responsible for any inaccuracy of the data in the lists. To report any inaccuracy or your business (if you own the business in question), please write to info@scegliauto.com
Number of seconds to generate the page: 0.036
(c) ScegliAuto 2024 - info@scegliauto.com - Privacy Policy VAT number: IT01247470535 |