
|
Do it yourself
| |||
| ||||


Front Shock Absorber Replacement
Model: Mercedes Classe C
W202
- Years:
1993, 1994, 1995, 1996, 1997, 1998, 1999, 2000
This video is currently unavailable
This video describes how to replace the front shock absorbers. First, lift the car on the lift and locate the bolts that hold the shock absorber; one is easily accessible from the hood and the other is at the end of the shock above the control arm. Before proceeding, support the control arm with a hydraulic jack, then remove the bolts and the shock absorber. To install the new shock absorber, first, tighten only the rear bolt and place the upper shaft in its housing without tightening any bolts; only after slightly lowering the car from the lift and applying pressure on the new shock absorber will you tighten the upper bolt.
Updated on 9 February 2026 by ScegliAuto
Related tutorials
Mercedes Classe C
(2000-2007 /
W203)
Remove a front shock absorber from a Mercedes C-Class. Follow these steps carefully: Loosen the wheel nuts, lift the car on a column lift, and remove…

Mercedes Classe C
(2007-2013 /
W204)
The component that connects the end of the anti-roll bar to the shock absorber bracket is called a link rod, but it is better known as a sway bar lin…

Mercedes Classe C
(1983-1993 /
)
Lift the vehicle and remove the wheel corresponding to the repair area.
Using appropriate clamps, compress the suspension spring until you can remove…
ScegliAuto offers an extensive international collection of automotive tutorials available in 12 languages. Each guide combines instructional videos with original explanations written by experienced human editors, along with information about the car models covered.
Other guides you may be interested in
|
Where is the battery located on the Aprilia Scarabeo 250ie scooter?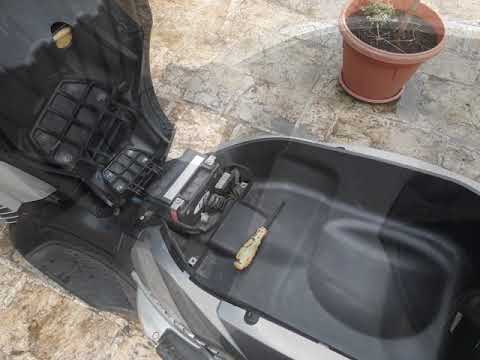
This video shows where the battery is located on the Aprilia Scarabeo 250ie scooter and how to proceed if you need to replace it. As shown, it is located beneath the seat. To access and replace it, first open the seat, then remove the plastic cover by unscrewing the relevant screws with a cross-head screwdriver. Next, disconnect both terminals, starting with the negative, remove the battery from its housing, and install the new replacement following the reverse procedure. by ScegliAuto More videos
|
|
For advertising on this site Write to info@scegliauto.com
ScegliAuto is not responsible for any inaccuracy of the data in the lists. To report any inaccuracy or your business (if you own the business in question), please write to info@scegliauto.com
Number of seconds to generate the page: 0.037
(c) ScegliAuto 2026 - info@scegliauto.com - Privacy policy - About us VAT number: IT01247470535 |
