
|
Do it yourself
| |||
| ||||


Fuse box and fuse positioning of the Mini Cooper
Model: Mini Mini
R55, R57, R56
- Years 2007-2014
These short and simple instructions will show us the layout and positioning of the internal and external fuses of the Mini Cooper. First of all, we get on board the car, on the passenger side, and start removing the plastic panel found at the bottom on the side, thus accessing the internal fuse box; we find another fuse box in the engine compartment, removing the plastic cover to access it, as shown in the video. At this point, we find the fuse layout inside the covers, also available in the vehicle's owner's manual!
Posted on 14 October 2024 by ScegliAuto
Video tutorial
Related tutorials
Mini
(2001-2007 /
R53, R50, R52)
Today's instructions will show us the positioning and layout of the internal fuses of the Mini Cooper, following these simple steps. First, we climb …

Mini
(2007-2014 /
R55, R57, R56)
In this guide we will see the positioning and the diagram of the internal fuse box of the Mini Cooper, in simple and quick steps. First, we open the …

Mini
(2007-2014 /
R55, R57, R56)
Let's briefly see the instructions that will allow us to access the internal fuse box of the Mini Cooper, in simple steps. First, we board the vehicl…
Other guides you may be interested in
|
How to Remove the Third Brake Light from a Renault Clio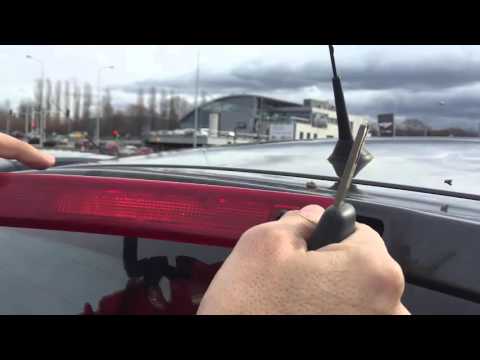
In this video, we will see how to remove the third brake light from a Renault Clio. First, open the boot lid and remove the plastic rivets with a screwdriver, then close the boot. Extract the third brake light from the metal of the boot lid using your hands. Once the piece is removed from its housing, disconnect the power connector and attach the new third brake light. After fitting the bulbs, insert the piece back into the boot lid and secure it with the plastic rivets. Finally, check the correct operation of the lights after turning on the instrument panel. by ScegliAuto More videos
|

|
For advertising on this site Write to info@scegliauto.com
ScegliAuto is not responsible for any inaccuracy of the data in the lists. To report any inaccuracy or your business (if you own the business in question), please write to info@scegliauto.com
Number of seconds to generate the page: 0.112
(c) ScegliAuto 2026 - info@scegliauto.com - Privacy policy VAT number: IT01247470535 |