
|
Do it yourself
| |||
| ||||



How to Reset the Tyre Pressure Warning Light on an Opel Astra J
Model: Vauxhall Astra
Astra J
- Years:
2009, 2010, 2011, 2012, 2013, 2014, 2015, 2016
Video tutorial
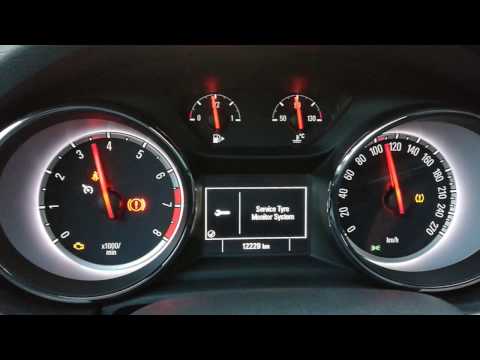
The procedure to reset the tyre pressure on the Opel Astra J is quick and manual. First, ensure you have checked the pressure of all four tyres. Turn on the vehicle's instrument panel, press the "menu" button located on the left side of the steering wheel. Navigate to the "tyre pressure settings" option using the up/down arrow buttons (or the scroll wheel; it depends on the trim). When the option is highlighted, press the "set/ok" button to confirm. You will hear a brief beep confirming the reset, and then the message "tyre check active" will appear. At this point, the light will be off. Drive for 10-15 minutes at speeds above 15 mph to allow the system to recalibrate.
Posted on 11 July 2026 by ScegliAuto
Related tutorials
Vauxhall Astra
(2009-2016 /
Astra J)
To reset the tyre pressure warning light on an Opel Astra, inflate the flat tyres to the recommended pressure. The correct inflation pressure is indi…

Vauxhall Astra
(2015-2022 /
Astra K)
This tutorial shows how to reset the tyre warning light on an Opel Astra K, a simple operation that requires the use of a scanner like the one shown …
Vauxhall Astra
(2015-2022 /
Astra K)
To reset the tyre pressure warning light on the Opel Astra, inflate the deflated tyres to the recommended pressure. The correct inflation pressure is…
Other guides you may be interested in
|
How to Remove the Rear Seat of a Hyundai Tucson?
To remove the rear seat of a Hyundai Tucson, follow these steps. Start by moving the front seats to their most forward position to gain space. Next, locate the release lever on the underside of the rear seat, near the floor. Press this lever down while pulling the seat upwards to unlock it from the anchor pins. Once unlocked, tilt the seat upwards and forwards to remove it from its position. Repeat this process for both sides of the rear seat. Be careful of any electrical cables or components that may be connected to the seat during removal. Once the rear seat is removed, the disassembly is complete. by ScegliAuto More videos
|
|
For advertising on this site Write to info@scegliauto.com
ScegliAuto is not responsible for any inaccuracy of the data in the lists. To report any inaccuracy or your business (if you own the business in question), please write to info@scegliauto.com
Number of seconds to generate the page: 0.025
(c) ScegliAuto 2026 - info@scegliauto.com - Privacy policy VAT number: IT01247470535 |
