
|
Do it yourself
| |||
| ||||


Valve clearance adjustment instructions
Model: Peugeot 206
MK 1
- Years 1998-2012 When the intake and exhaust valve opening system takes excessive play, a clicking noise is heard coming from under the tappet cover because, due to the excessive play, the cam hits the valve plate: Ã It is therefore possible to record everything by adopting a special thickness gauge. Therefore, once the tappet cover and the timing belt cover have been removed, rotate the crankshaft pulley in order to align the timing references and position the exhaust valve of the first cylinder in the maximum open position: in this configuration, evaluate and, if necessary, adjust the clearance of the intake valve of the third cylinder and that of the exhaust of the fourth (in French engines the numbering of the cylinders starts from the side opposite to the distribution and therefore the cylinders are counted from right to left looking at the engine from the front; the intake ones are the rear ones and the exhaust ones the front ones) Adjustment is done by loosening the lock nut and screwing or unscrewing the adjusting screw as needed; once you are sure of the necessary play, retighten the lock nut. Rotate the crankshaft again to fully open the third cylinder exhaust valve and adjust the fourth cylinder intake and the second exhaust. Then proceed with positioning the exhaust of the fourth cylinder at maximum opening and adjust the intake of the second cylinder and the exhaust of the first. Finally, position the exhaust of the second cylinder at maximum opening and adjust the intake of the first cylinder and the exhaust of the third. The sequence is therefore that of the explosion: 1342. Finally, reassemble the tappet cover.
Posted on 22 July 2023 by ScegliAuto
 How do you adjust the valves of the Peugeot 206?
Peugeot 206 (1998-2012 / MK 1) In order to adjust the valves of the Peugeot 206, you need to open the hood so that you can access the components located inside the engine compartme 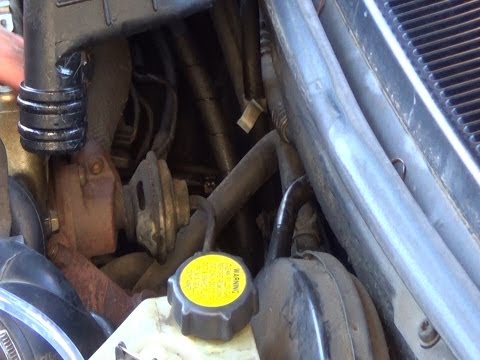 Check operation of the EGR valve
Peugeot 206 (1998-2012 / MK 1) The EGR valve has the function of introducing a part of the exhaust gases back into the intake in order to reduce nitrogen oxide emissions (NOx); the 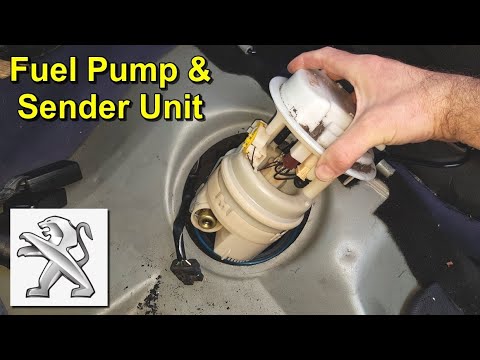 How do I replace the fuel pump on the Peugeot 206?
Peugeot 206 (1998-2012 / MK 1) To be able to replace the fuel pump of the Peugeot 206 you must first open the hood and disconnect the three breather pipes of the engine, so that yo Other guides that may interest you
|
How to remove the telepass holder from the windshield
Today we will explain how to remove the telepass holder from a vehicle's windshield. Removing the telepass holder from the windshield is a very simple and quick operation to perform independently, you just need to use nylon thread that you will need to pull towards the holder and pass it between the holder and the clip. After performing this operation, the holder will be removed. There may be glue residues on the windshield that can be removed with a solvent suitable for glass cleaning. After cleaning everything, it is possible to mount another telepass holder on the windshield in the same position as the one removed or elsewhere. by ScegliAuto More videos
|
|
For advertising on this site Write to info@scegliauto.com
ScegliAuto is not responsible for any inaccuracy of the data in the lists. To report any inaccuracy or your business (if you own the business in question), please write to info@scegliauto.com
Number of seconds to generate the page: 0.075
(c) ScegliAuto 2025 - info@scegliauto.com - Privacy Policy VAT number: IT01247470535 |