
|
Do it yourself
| |||
| ||||


How do you reset the uConnect system of the RAM 1500?
Model: RAM 1500
MK 5, DT
- Years 2019-2026
In order to perform a reset of the uConnect system of the RAM 1500 car radio, you will need to insert the ignition key and turn on the instrument panel without starting the vehicle. Once the screen on the radio display appears, you will need to press and hold the fingertip in the top right area of the central touch screen for about 15 seconds, until the screen turns off completely. At this point, the system will restart, the screen will turn on by itself, and the settings will have been reset.
Posted on 9 July 2024 by ScegliAuto
Video tutorial
Related tutorials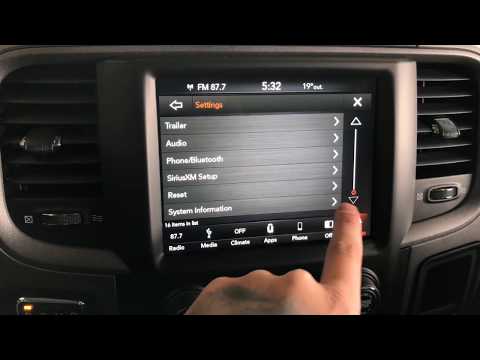
RAM 1500
(2019-2026 /
MK 5, DT)
In order to reset the Dodge RAM uConnect system, you must go inside the passenger compartment and turn on the instrument panel. You will need to sele…

RAM 1500
(2019-2026 /
MK 5, DT)
In our RAM 1500 pick-up truck, it may happen that the Uconnect 5 multimedia system shows various signs of malfunction, such as continuous freezes or …
RAM 1500
(2009-2019 /
MK 4, DJ, DS)
In order to reset the Dodge Ram's uConnect system, you need to insert the key and turn on the instrument panel, so you can turn on the central dashbo…
Other guides you may be interested in
|
Removing and Replacing a Front Headlamp of a Lancia Lybra
This video explains how to remove and replace the front headlamp and its bulbs on a Lancia Lybra. The car has a very simple and quick headlamp removal system. To start, lift the bonnet, reach into the engine bay, and (specifically at the rear of the headlamp) unclip the metal tab that secures the headlamp, then use a screwdriver to undo the few Torx screws. After removing the screws, unclip the headlamp and pull it out from the bumper, disconnect the power connectors, and replace any damaged bulbs or the entire unit. The reassembly phase is very straightforward: insert the headlamp into the bumper housing as shown in the video, secure the metal tab until the headlamp clicks into place (screw in the securing screws). Finally, test the correct operation of the lights. by ScegliAuto More videos
|

|
For advertising on this site Write to info@scegliauto.com
ScegliAuto is not responsible for any inaccuracy of the data in the lists. To report any inaccuracy or your business (if you own the business in question), please write to info@scegliauto.com
Number of seconds to generate the page: 0.104
(c) ScegliAuto 2026 - info@scegliauto.com - Privacy policy VAT number: IT01247470535 |