
|
Do it yourself
| |||
| ||||


How to Check the Wiring of a Coil on a Renault Clio III
Model: Renault Clio
Clio 3, Clio III, MK 3
- Years 2005-2013
Let's see how to check the wiring of a coil on a Renault Clio 1.5 DCi: the car was struggling to go uphill due to a lack of power. The coil has 4 wires. The 1st white wire is connected to the oil sensor, the 2nd white wire is connected to a small electronic capacitor, the 3rd purple wire is connected to the ECU, and the green one may be the ground. The capacitor stabilises the voltage and protects the circuit from electrical spikes; if it fails, it can cause coil malfunctions. Clean the oxidised connectors and check that the wires are not broken or frayed. Remove the old coil and connect the new one, following the previously indicated wire scheme. Use insulating tape to protect the connections and secure the cables to prevent harmful vibrations. After the repair, the car should maintain a steady idle and regain power.
Posted on 21 February 2026 by ScegliAuto
This video is currently unavailable
Related tutorials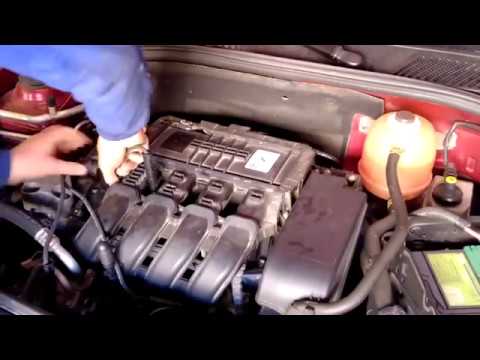
Renault Clio
(2005-2013 /
Clio 3, Clio III, MK 3)
Does the coil of our car need to be changed? Let's see how it replaces on a Renault clio. We pull the lever to open the engine compartment located at…

Renault Clio
(2005-2013 /
Clio 3, Clio III, MK 3)
To replace the spark plugs of the Renault Clio, we open the hood of the engine compartment, remove the engine cover. Disconnect the connector of the …

Renault Clio
(2005-2013 /
Clio 3, Clio III, MK 3)
Replacing the fog light bulb on a Renault Clio 3 is a simple and quick operation that can be done independently. To replace it, we need to use a plas…
Other guides you may be interested in |
Installation of Upgraded Intercooler Radiator with Pipes
Lift the vehicle on suitable axle stands, remove the front wheels, and then the front bumper and grille. Proceed to remove the front headlights; drain the coolant, remove the intercooler radiator and the hoses connecting it to the intake system. Position the new intercooler radiator in the grille, temporarily securing it with cable ties, and mark with a marker the part of the metal that needs to be removed to allow the new hoses to pass through. Cut the marked portion of metal and apply a gasket to the edge. Remove the inner cover of the bumper and position it near the radiator to identify any interfering parts to eliminate: again, apply a gasket to the edge of the cut. Create brackets for securing the new radiator and proceed with the installation of the connecting pipes from the radiator to the intake, shaping and connecting them appropriately. Finally, reassemble the bumper, headlights, and grille. by ScegliAuto More videos
|

|
For advertising on this site Write to info@scegliauto.com
ScegliAuto is not responsible for any inaccuracy of the data in the lists. To report any inaccuracy or your business (if you own the business in question), please write to info@scegliauto.com
Number of seconds to generate the page: 0.048
(c) ScegliAuto 2026 - info@scegliauto.com - Privacy policy VAT number: IT01247470535 |