
|
Do it yourself
| |||
| ||||


How to Solve Issues with the Climatronic on the Octavia II
Model: Skoda Octavia
1Z, MK 2
- Years:
2004, 2005, 2006, 2007, 2008, 2009, 2010, 2011, 2012
Video tutorial
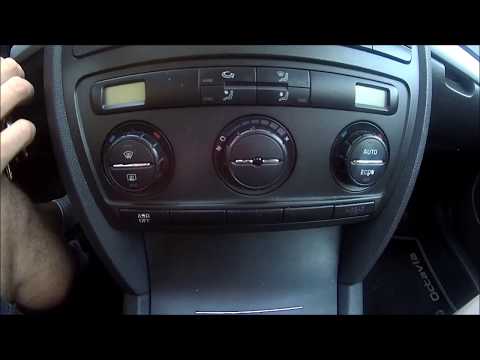
In this video, we see the solution to a rather common problem with the climatronic air conditioning on the Skoda Octavia II: the climatronic knobs do not respond correctly to commands, achieving the opposite of what we wanted to set, with jerky movements or failing to register inputs. The main cause is wear and the accumulation of dirt inside the electromechanical components under the knobs. Over time, dust and debris mix with the lubrication grease, creating an abrasive paste that interferes with the electrical signals, sending incorrect readings to the control unit. How to repair it? Remove the key from the ignition, take the key out of the climatronic frame, gently insert a thin screwdriver (wrapped in a cloth to avoid scratching) into a gap and pry around the perimeter. As shown in the video, behind the knobs, there are retaining rings; using flat-nosed pliers, pull them towards you and remove them; clean them with compressed air, use a contact cleaner, and then clean the outer parts with a cotton bud. Allow the product to evaporate completely, then reassemble the knobs, secure the rings, and reattach the frame.
Posted on 28 May 2026 by ScegliAuto
Related tutorials
Skoda Octavia
(2004-2012 /
1Z, MK 2)
It will be possible to reset the Climatronic of the Škoda Octavia by inserting the ignition key into the corresponding slot: once the instrument pane…
Skoda Octavia
(2012-2019 /
5E, MK 3)
To reset the Climatronic on a Škoda Octavia, insert the ignition key into the ignition switch. Once the dashboard is powered on, use the buttons loca…

Skoda Octavia
(1996-2004 /
MK 1, 1U)
You can reset the Climatronic on the Škoda Octavia by inserting the ignition key into the corresponding switch. Once the cluster is activated, press …
Other guides you may be interested in
|
How to Open the Hood of the BMW X3
Today, you will learn how to open and close the hood of the BMW X3. To perform this simple operation, lift the hood release lever located next to the door seal on the driver’s side. After pulling the lever, you will notice that the hood will lift slightly. Position yourself in front of the hood and lift it after moving the internal lever from left to right. To keep the hood secure during maintenance, use the side support rod. To close the hood, simply let it fall back into place. by ScegliAuto More videos
|
|
For advertising on this site Write to info@scegliauto.com
ScegliAuto is not responsible for any inaccuracy of the data in the lists. To report any inaccuracy or your business (if you own the business in question), please write to info@scegliauto.com
Number of seconds to generate the page: 0.084
(c) ScegliAuto 2026 - info@scegliauto.com - Privacy policy VAT number: IT01247470535 |
