
|
Do it yourself
| |||
| ||||


How to install a roof rack on your Toyota.
Model: Toyota Auris
E180
- Years 2012-2018 In this video, we can see how to install a roof rack on our Toyota, which will be useful for luggage, sports equipment, or other loads. They also serve as a base for a variety of accessories. On the roof, there are four installation points that can be identified from the user manual, and they are 35 cm apart from the front pillar and 45 cm apart from the rear pillar. Clean the area inside the door frame well to apply the protective film, then install the four rubber end pads, applying them to the ends of the racks on the underside of the roof rack, where the noise-reducing spoilers will also be applied; then push the pad onto each foot of the roof rack. Now we will apply the bars over the protectors that we had already applied to the doors, insert the clamp and tighten it until we hear the click of the key. After applying some liquid soap to reduce friction, install the rubber cover in the "T" slot on each roof rack, cutting off the excess, and finally install the cover on each of the four clamps, using the provided key. The roof rack can support a maximum weight of 75 kg, to be evenly distributed, and with luggage on the roof, the speed should not exceed 120 km/h. It is advisable to check that the roof luggage is securely fastened every 100 km. It is recommended to remove it before entering a car wash.
Posted on 30 November 2023 by ScegliAuto
 How to install roof racks on a Toyota Auris.
Toyota Auris (2012-2018 / E180) Let's briefly see the instructions that will allow us to install the roof bars or roof racks of the Toyota Auris, following these simple steps. First  How to mount the rear bike rack on the Toyota Auris
Toyota Auris (2018-2024 / E210) In this video we see how to mount the original Toyota bike rack on the Auris. To proceed with the installation, it is necessary to have installed the 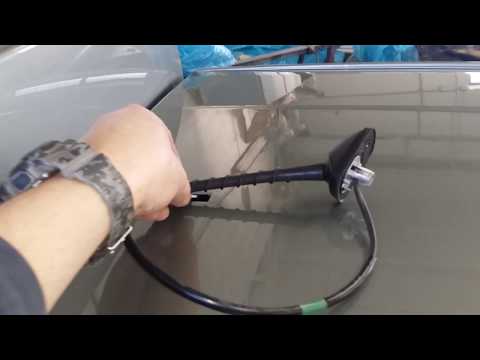 Toyota Auris antenna assembly
Toyota Auris (2012-2018 / E180) In this video tutorial we will see how to mount the signal reception antenna in a Toyota Auris. To mount it, first of all, insert the antenna in the Other guides that may interest you
|
Frequently Asked QuestionsHow to deactivate the safe lock on a Volkswagen Golf.
The safe lock is indeed an anti-theft system that prevents thieves from accessing the car. This device locks the doors, both externally and internally, when the driver activates the central locking remote control after leaving the vehicle. To permanently disable it, it is necessary to use a diagnostic program such as VCDS that we will connect to the vehicle through the ODBII port. Then wait for the connection and recognition of the control unit and then select the blocks present and locate the safe lock to disable it. And the job will be completed. by ScegliAuto More videos
|
|
For advertising on this site Write to info@scegliauto.com
ScegliAuto is not responsible for any inaccuracy of the data in the lists. To report any inaccuracy or your business (if you own the business in question), please write to info@scegliauto.com
Number of seconds to generate the page: 0.064
(c) ScegliAuto 2024 - info@scegliauto.com - Privacy Policy VAT number: IT01247470535 |