
|
Do it yourself
| |||
| ||||


How to replace the Honda CR-V gearshift gaiter
Model: Honda CR-V
MK 4
- Years 2012-2017
It is possible to buy in the after market a new gear lever cover complete with knob and made of leather with colored stitching in the seams; disassembly is quite simple to carry out: you start by unhooking the knob of the gear lever by making it rotate; then move on to the frame at the base of the gear lever which is released by levering along the contour; at this point, the chromed frame that holds the cap in place must be unhooked, then unhooking the leather flaps from the plastic support; apply new double-sided adhesive on the plastic tabs to insert and glue the flaps of the new cap, then always fixing it with the chromed frame; then insert the boot complete with knob on the gear lever, fixing it with the appropriate dowels and re-hooking the frame to the tunnel support.
Posted on 7 January 2020 by ScegliAuto
Video tutorial
Related tutorials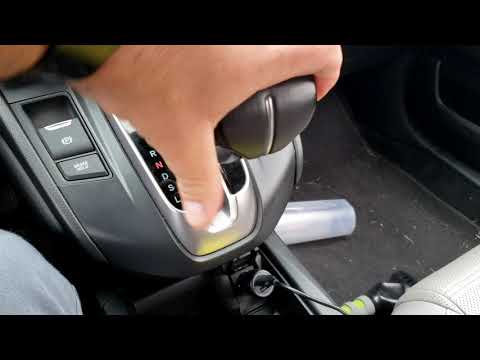
Honda CR-V
(2007-2012 /
MK 3)
In order to replace the Honda CR-V gear knob, you need to remove the front part of the gear knob, using a thin object as a lever. Once this cover has…
Honda CR-V
(2007-2012 /
MK 3)
Let's see in this video how to disassemble the central tunnel on a Honda Cr V. With a plastic lever we remove by leveraging the covering placed in th…

Honda CR-V
(2007-2012 /
MK 3)
To replace the Honda Cr V cruise control switch unit, proceed as follows: 1) Disconnect the battery. 2) Remove the cover on the internal base of the …
Other guides you may be interested in |
Installation of Upgraded Intercooler Radiator with Pipes
Lift the vehicle on suitable axle stands, remove the front wheels, and then the front bumper and grille. Proceed to remove the front headlights; drain the coolant, remove the intercooler radiator and the hoses connecting it to the intake system. Position the new intercooler radiator in the grille, temporarily securing it with cable ties, and mark with a marker the part of the metal that needs to be removed to allow the new hoses to pass through. Cut the marked portion of metal and apply a gasket to the edge. Remove the inner cover of the bumper and position it near the radiator to identify any interfering parts to eliminate: again, apply a gasket to the edge of the cut. Create brackets for securing the new radiator and proceed with the installation of the connecting pipes from the radiator to the intake, shaping and connecting them appropriately. Finally, reassemble the bumper, headlights, and grille. by ScegliAuto More videos
|

|
For advertising on this site Write to info@scegliauto.com
ScegliAuto is not responsible for any inaccuracy of the data in the lists. To report any inaccuracy or your business (if you own the business in question), please write to info@scegliauto.com
Number of seconds to generate the page: 0.044
(c) ScegliAuto 2026 - info@scegliauto.com - Privacy policy VAT number: IT01247470535 |