
|
Do it yourself
| |||
| ||||


Timing Belt: How to Adjust the Tension on a Range Rover Evoque
Model: Land Rover Evoque
L538, MK 1
- Years 2011-2018
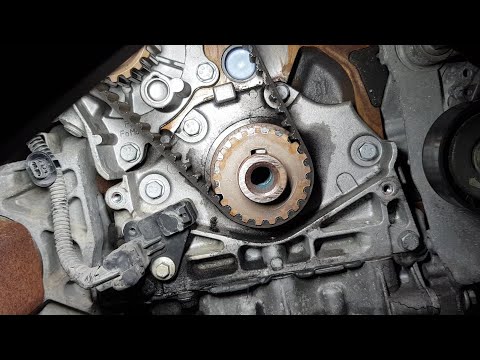
On the Range Rover Evoque 2.2 SD4 190 HP, the timing belt tension adjustment is performed with the engine off, the vehicle secured, and the work area clear. After removing the necessary covers, align the crankshaft and camshafts to the reference position using the specified locking tools. With the belt path correctly set, adjust the tensioner until the indicator aligns with the reference window/scale; then tighten the tensioner fastener according to specifications. Manually rotate the crankshaft two complete turns; once the alignments are restored, recheck the tension indicator and, if necessary, make a small adjustment to center the reference. After verification, reposition the covers and perform a final visual check of the proper movement of the belt over the rollers and the crankshaft sprocket.
Posted on 6 June 2026 by ScegliAuto
Video tutorial
Related tutorials
Land Rover Evoque
(2011-2018 /
L538, MK 1)
This short and simple guide will show us the information related to the disassembly and replacement of the timing belt of the Range Rover Evoque, wit…
Land Rover Evoque
(2011-2018 /
L538, MK 1)
This brief video guide shows the steps necessary to replace the timing belt on a first-generation Range Rover Evoque, produced from 2011 to 2018. Thi…

Land Rover Evoque
(2011-2018 /
L538, MK 1)
To replace the timing belt on a Land Rover Evoque, loosen the bolts securing the right front wheel and those securing the inner fender cover. By remo…
Other guides you may be interested in
|
How to Replace the External Wing Mirror on a Ford C MAX
In the event of a breakage, it will be necessary to replace the external wing mirror on the 2011 Ford C MAX. This operation is easily performed independently. Start by removing the internal cover of the mirror with a plastic lever. Then, use a socket wrench to remove the securing pins. Once the pins are removed, you can take off the mirror, but not before disconnecting the power connectors. Then proceed to fit the new mirror. First, connect the connectors and then secure the mirror to its housing with the pins. Refit the plastic cover and test the operation of the electric mirror using the controls. by ScegliAuto More videos
|

|
For advertising on this site Write to info@scegliauto.com
ScegliAuto is not responsible for any inaccuracy of the data in the lists. To report any inaccuracy or your business (if you own the business in question), please write to info@scegliauto.com
Number of seconds to generate the page: 0.084
(c) ScegliAuto 2026 - info@scegliauto.com - Privacy policy VAT number: IT01247470535 |
