
|
Do it yourself
| |||
| ||||


How to replace the rear brake pads of the Opel Astra
Model: Vauxhall Astra
Astra J
- Years 2009-2016
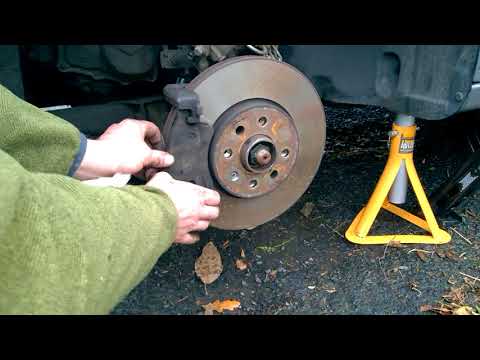
With the help of the following video tutorial, we will explain how to replace the rear brake pads of the Opel Astra model J. First, we open the front hood and then the brake fluid reservoir. We move to the back of the car and loosen the wheel bolts, lift the car and remove the rear wheels. Lower the handbrake and proceed with the disassembly of the brake pads. Using a 10mm socket wrench, unscrew the upper screw of the caliper and then with a 13mm wrench, unscrew the anti-vibration insert. Use a flat screwdriver to lever off the caliper from its support and remove the caliper and pads by sliding them off the disc. Clean the end of the pad support with a metal brush. Then start the assembly. Grease the new pads and slide them into the support, then push the piston with the specific tool. Mount the caliper and tighten the screw, then insert the anti-vibration pad. Tighten with a torque wrench and move on to the rear brake pads on the left side. Finally, screw the brake fluid cap, mount the wheels and lower the car.
Posted on 14 June 2024 by ScegliAuto
Video tutorial
Related tutorials
Vauxhall Astra
(2004-2010 /
Astra H)
To remove the rear brake pads from an Opel Astra, position your car on a column lift and raise it to a comfortable height for working. Unscrew the bo…
Vauxhall Astra
(1998-2006 /
Astra G)
Replacing the rear brake pads is straightforward, but it is advisable to use a special tool to rotate and retract the piston of the brake caliper. Li…
Vauxhall Astra
(2009-2016 /
Astra J)
How to replace the brake pads of the Opel Astra? Let's see the disassembly of the brake parts. We disassemble the wheel to access the brake disc, uns…
Other guides you may be interested in
|
How to Replace the Rear Light and Bulbs on a Ford Focus Year 2000
To replace the rear light and bulbs on a Ford Focus 2000/2004, first, open the tailgate of the boot. This gives access to the screw that holds the rear light in place. The screw to undo (using an appropriate screwdriver) is located inside the light and corresponds to the fold that accommodates the tailgate (as shown in the images). Once you start to undo it, continue with the operation and then remove the nut from the inside of the bodywork. At this point, you can remove the light, being careful to disconnect the electrical supply by unplugging the connectors or removing the entire bulb holder from its housing. This way, you can replace the bulbs. To reassemble everything, simply follow the described operations in reverse order. by ScegliAuto More videos
|

|
For advertising on this site Write to info@scegliauto.com
ScegliAuto is not responsible for any inaccuracy of the data in the lists. To report any inaccuracy or your business (if you own the business in question), please write to info@scegliauto.com
Number of seconds to generate the page: 0.067
(c) ScegliAuto 2026 - info@scegliauto.com - Privacy policy VAT number: IT01247470535 |