
|
Do it yourself
| |||
| ||||


Instructions for replacing the thermostat
Model: Mercedes Classe C
W203
- Years 2000-2007 Locate the thermostat in the engine compartment; for reasons of convenience, remove the plastic bulkhead near the cylinder head cover. Initially it is necessary to empty the cooling circuit by means of the drain located behind the front bumper at the bottom right in front of the car: to do this, connect the drain outlet to a sufficiently large tank (7 liters) through a plastic tube; then open the drain by unscrewing the dedicated control, so as to allow the coolant liquid to flow into the can. To facilitate release, keep the contact panel on and the internal heating controls set as if it were to emit hot air. At this point, acting on the plastic tube (made up of two sections) of the thermostat, release the metal sealing ring and detach the lower part of the tube. Now unscrew the two screws that secure the upper portion of the tube to the engine block and then, pulling it outwards, remove the thermostat. Therefore, take the new spare part which will be equipped with the two gaskets necessary for assembly, a cylindrical one to be applied in contact with the plastic pipe and a square one to be applied near the metal valve. Now insert the new thermostat in the engine block by performing the reverse procedure, tighten the screws of the upper tube and insert the latter by interlocking with the other portion of the tube. Tighten the sealing ring. Returning to the underbody, close the bleed control by screwing it and fill the coolant reservoir up to the "max" mark by closing the relative cap. Finally, reassemble the plastic bulkhead disassembled at the start.
Posted on 26 June 2023 by ScegliAuto
 Replacing the thermostat on a Mercedes C-Class
Mercedes Classe C (2007-2013 / W204) Replacing a damaged thermostat on a Mercedes C-Class? Let's see how to do it. We open the front hood, remove the hose clamps as shown in the video. W 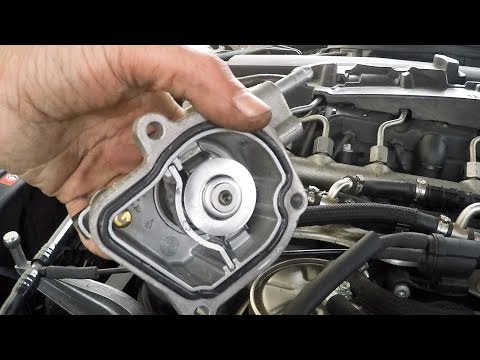 How do you replace the thermostat on the Mercedes C-Class 220 cdi?
Mercedes Classe C (2007-2013 / W204) The thermostat is a fundamental electrical component for the engine, or rather for its temperature, as if it does not work as it should, there is a r  How to replace the thermostat in the Mercedes C-Class?
Mercedes Classe C (2000-2007 / W203) In this tutorial we can see how to replace the thermostat in the Mercedes C-Class, an extremely simple and quick operation. First of all, make sure t Other guides that may interest you
|
How to remove the telepass holder from the windshield
Today we will explain how to remove the telepass holder from a vehicle's windshield. Removing the telepass holder from the windshield is a very simple and quick operation to perform independently, you just need to use nylon thread that you will need to pull towards the holder and pass it between the holder and the clip. After performing this operation, the holder will be removed. There may be glue residues on the windshield that can be removed with a solvent suitable for glass cleaning. After cleaning everything, it is possible to mount another telepass holder on the windshield in the same position as the one removed or elsewhere. by ScegliAuto More videos
|
|
For advertising on this site Write to info@scegliauto.com
ScegliAuto is not responsible for any inaccuracy of the data in the lists. To report any inaccuracy or your business (if you own the business in question), please write to info@scegliauto.com
Number of seconds to generate the page: 0.258
(c) ScegliAuto 2025 - info@scegliauto.com - Privacy Policy VAT number: IT01247470535 |