
|
Do it yourself
| |||
| ||||


How to Fix the 2018 MG 3 Mileage Display Issue
Model: MG 3
MK 2
- Years 2011-2024
This is an error that seems to affect only the 2018 production, so if your vehicle was manufactured in a year before or after, you will not be affected. On the 2018 MG 3, it frequently happens that the display showing the mileage indicates an error message. Our YouTuber identified the problem as the OBD not recognizing the vehicle's VIN, indicating a mismatch. Considering that a 2018 vehicle will not have warranty expiration issues—unlike the type of intervention we will perform—there is no problem. You need to remove the glove compartment and disconnect all the connectors you find behind it. Of course, you must first disconnect the negative battery terminal! Wait a few minutes and reconnect all the connectors. Reinstall the glove compartment and reconnect the battery. The problem is now resolved.
Updated on 22 July 2026 by ScegliAuto
This video is currently unavailable
Related tutorials
MG 3
(2011-2024 /
MK 2)
We can see in this video what information we can access through the MG3 dashboard: total mileage of the car through the odometer, kilometers traveled…

MG 3
(2011-2024 /
MK 2)
To locate the fuses on an MG 3, get inside the vehicle and find the internal fuse box located under the dashboard on the driver's side, usually near …

MG 3
(2024-2026 /
MK 3)
The courtesy lights pre-installed by the manufacturer on the MG 3 provide a warm light that is not particularly functional. If desired, you can repla…
Other guides you may be interested in
|
Where is the Fuel Filter Located in a Volvo XC60?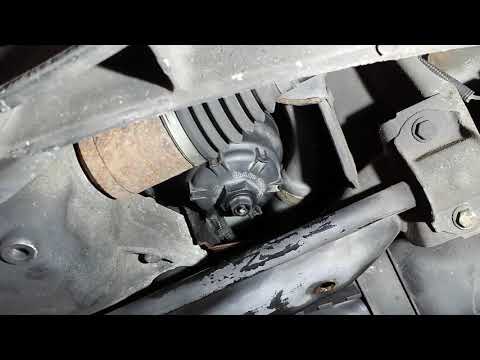
In this video, you will see where the fuel filter is located in a Volvo XC60 and how to proceed if you need to replace it. As shown, the filter is positioned at the lower part of the engine, right between the left half-shaft and the sway bar attachment. To replace the filter, first, go underneath the vehicle, taking all necessary safety precautions. Then, using an 18mm wrench, open the drain valve and allow any water present to escape. Next, unscrew the housing, remove the old filter, insert the replacement along with a new gasket, and reassemble everything. by ScegliAuto More videos
|

|
For advertising on this site Write to info@scegliauto.com
ScegliAuto is not responsible for any inaccuracy of the data in the lists. To report any inaccuracy or your business (if you own the business in question), please write to info@scegliauto.com
Number of seconds to generate the page: 0.172
(c) ScegliAuto 2026 - info@scegliauto.com - Privacy policy VAT number: IT01247470535 |
