
|
Do it yourself
| |||
| ||||


Replacing Glove Box Lock
Model: BMW Serie 5
E39
- Years 1995-2003
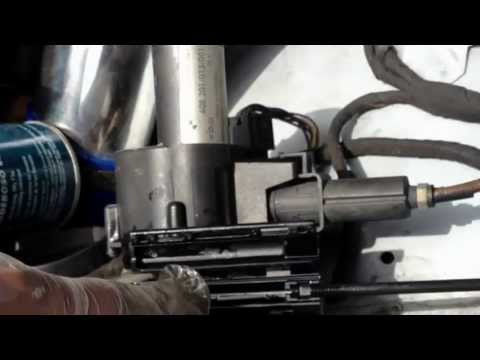
In this case, the video shows not only the disassembly but also the actual construction of the new lock; inside the lock, there are shaped wafers that align perfectly according to the key's cuts, meaning they have different groove depths that match perfectly with those on the key, allowing it to open; for this reason, the wafers are numbered according to their depth; then extract the old cylinder from the glove box handle and remove the wafers without losing track of their positions (make a sketch as shown in the video) and note their numbering; then insert the new wafers of the same numbering into the same positions and complete the installation.
Updated on 17 February 2026 by ScegliAuto
Video tutorial
Related tutorials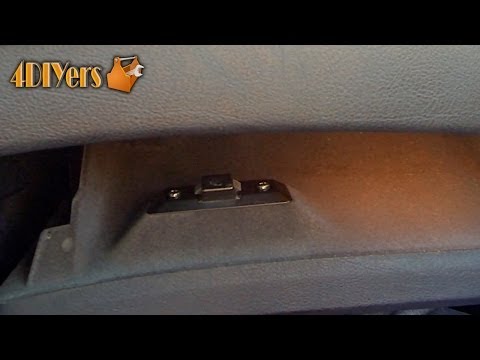
BMW Serie 5
(1995-2003 /
E39)
If the lock of the glove box door tends to jam, it is essential to disassemble it before it gets stuck, making it impossible to open (unless you brea…

BMW Serie 5
(2023-2026 /
G61, G68, G60)
The 2023 BMW 5 Series contains two fuse boxes. Unlike the first box, which is located under the hood, the second one is found inside the cabin, speci…
BMW Serie 5
(1995-2003 /
E39)
The front hood release cable runs from the release lever, located near the driver’s side kick panel, to the hood latch; this cable is divided into tw…
Other guides you may be interested in
|
Installation of Upgraded Intercooler Radiator with Pipes
Lift the vehicle on suitable axle stands, remove the front wheels, and then the front bumper and grille. Proceed to remove the front headlights; drain the coolant, remove the intercooler radiator and the hoses connecting it to the intake system. Position the new intercooler radiator in the grille, temporarily securing it with cable ties, and mark with a marker the part of the metal that needs to be removed to allow the new hoses to pass through. Cut the marked portion of metal and apply a gasket to the edge. Remove the inner cover of the bumper and position it near the radiator to identify any interfering parts to eliminate: again, apply a gasket to the edge of the cut. Create brackets for securing the new radiator and proceed with the installation of the connecting pipes from the radiator to the intake, shaping and connecting them appropriately. Finally, reassemble the bumper, headlights, and grille. by ScegliAuto More videos
|
|
For advertising on this site Write to info@scegliauto.com
ScegliAuto is not responsible for any inaccuracy of the data in the lists. To report any inaccuracy or your business (if you own the business in question), please write to info@scegliauto.com
Number of seconds to generate the page: 0.110
(c) ScegliAuto 2026 - info@scegliauto.com - Privacy policy VAT number: IT01247470535 |