
|
Do it yourself
| |||
| ||||


How to reset the AdBlue warning light on the Mazda CX7
Model: Mazda Cx 7
MK 1
- Years 2006-2012
In this video we see how in some cases, the DPF light on the Mazda CX7 can be reset without using an OBD2 scanner, using a manual method that involves grounding a specific cable. This procedure is useful if you do not have diagnostic tools. We will need an electrical cable and a key, to mount any covers. Identify the correct cable, which is the gray/black one in the area of the ECU, near the engine compartment (where the DPF is located). Connect one end of the cable to the identified gray/black cable, and the other end to a battery ground. Now reset the ECU: turn on the electrical system without starting the engine, press the accelerator fully ten times in rapid succession, turn off the electrical system and wait a few seconds. Restart the engine: the DPF light should have been reset. If it remains on, repeat the entire procedure; perhaps we skipped a step.
Posted on 17 July 2025 by ScegliAuto
Video tutorial
Related tutorials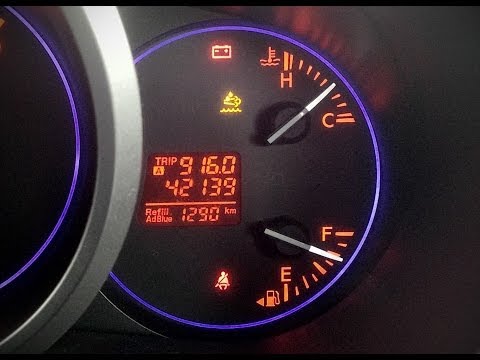
Mazda Cx 7
(2006-2012 /
MK 1)
Let's see in this short guide how to reset the Mazda CX-7 missing AdBlue warning light; the AdBlue warning light comes on due to a lack of fluid in t…

Mazda Cx 7
(2006-2012 /
MK 1)
In this video, we can see how to access the AdBlue connectors of the Mazda CX7: these connectors are used to ensure the correct functioning of the Se…
Mazda Cx 7
(2006-2012 /
MK 1)
To reset the SCR warning light (which corresponds to the AdBlue warning light), after actually filling the car with the required additive, get into t…
Other guides you may be interested in
|
Removing the Rear Door Panel of the Punto Evo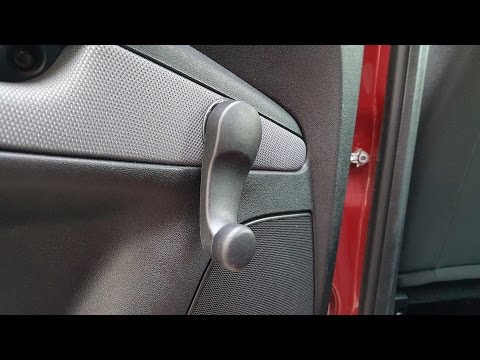
Here’s how to remove the rear door panel: gently pull the window lift lever and detach the metal clip holding it in place using a flathead screwdriver; once removed, take off the plastic cap behind the door opening lever and unscrew the hex screw inside, along with the two screws located under the panel handle as shown in the video. After removing the two cross-head screws under the door panel, you can detach it from the door using two levers to extract the plastic clips (taking care not to break them). Once the panel is separated, disconnect the wire that operates the door opening lever by detaching it from its housing as demonstrated in the video. After completing the necessary operation (in the video, the window lifter was being fixed), proceed in reverse order to reposition the panel, close it, and secure it. by ScegliAuto More videos
|

|
For advertising on this site Write to info@scegliauto.com
ScegliAuto is not responsible for any inaccuracy of the data in the lists. To report any inaccuracy or your business (if you own the business in question), please write to info@scegliauto.com
Number of seconds to generate the page: 0.146
(c) ScegliAuto 2026 - info@scegliauto.com - Privacy policy VAT number: IT01247470535 |