
|
Do it yourself
| |||
| ||||


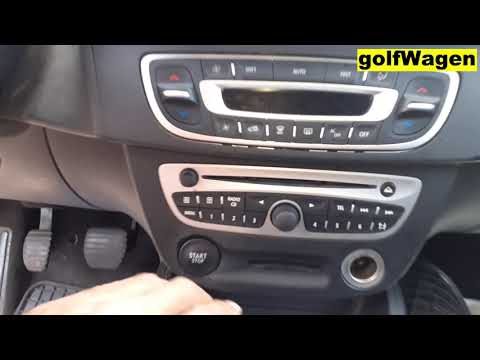
Location of the EOBD port on the Renault Megane III
Model: Renault Megane
Megane 3, Megane III
- Years 2008-2015
In this video we see where the EOBD (European On Board Diagnostic) port is located on a Renault Megane III: there is no difference between right-hand drive and left-hand drive on this model, because Renault, very cleverly, has placed this port in the central console, at the bottom, under a small plastic diaphragm, which is very easily removed. This port is used by professionals to interrogate the control unit, through sophisticated equipment, but it can also be useful to DIY enthusiasts. In fact, there are devices that cost a few tens of euros, and that allow us to make small interventions ourselves.
Posted on 16 July 2024 by ScegliAuto
Video tutorial
Related tutorials
Renault Megane
(2008-2015 /
Megane 3, Megane III)
In this video we can see where the EOBD (European On Board Diagnostic) port is located on our Renault Megane III: unlike most cars, where the diagnos…
Renault Megane
(2008-2015 /
Megane 3, Megane III)
In this video we see where to find the EOBD (European On Board Diagnostic) port on the Renault Megane III. This essential means of communication with…

Renault Megane
(2008-2015 /
Megane 3, Megane III)
In this video we see where the legal VIN (Vehicle Identification Number) is located on the Renault Megane III: the number is located on the inside of…
Other guides you may be interested in
|
Frequently Asked QuestionsInstallation of Upgraded Intercooler Radiator with Pipes
Lift the vehicle on suitable axle stands, remove the front wheels, and then the front bumper and grille. Proceed to remove the front headlights; drain the coolant, remove the intercooler radiator and the hoses connecting it to the intake system. Position the new intercooler radiator in the grille, temporarily securing it with cable ties, and mark with a marker the part of the metal that needs to be removed to allow the new hoses to pass through. Cut the marked portion of metal and apply a gasket to the edge. Remove the inner cover of the bumper and position it near the radiator to identify any interfering parts to eliminate: again, apply a gasket to the edge of the cut. Create brackets for securing the new radiator and proceed with the installation of the connecting pipes from the radiator to the intake, shaping and connecting them appropriately. Finally, reassemble the bumper, headlights, and grille. by ScegliAuto More videos
|
|
For advertising on this site Write to info@scegliauto.com
ScegliAuto is not responsible for any inaccuracy of the data in the lists. To report any inaccuracy or your business (if you own the business in question), please write to info@scegliauto.com
Number of seconds to generate the page: 0.042
(c) ScegliAuto 2026 - info@scegliauto.com - Privacy policy VAT number: IT01247470535 |