
|
Do it yourself
| |||
| ||||


How to Replace the Dashboard of the Control Panel
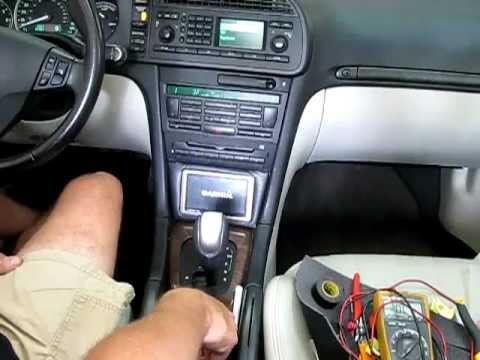
This video illustrates the steps to remove and replace the dashboard of the Saab 9-3. First, you need to remove the two air vents located in the driver's area: they are attached to the dashboard with clips, so to remove them, use a plastic lever and a small screwdriver to detach the clips. You can also use your fingers. Once the right vent is detached, pull it out of its slot. Perform the same operation for the left vent. Now remove the two screws that secure the radio unit, and after extracting it, disconnect its connectors. You can now slide out the button panel located next to the radio block; also detach its connector. Next, unscrew the seven screws that secure the entire panel (their location is indicated in the video). Move the steering wheel forward as much as possible and extract the dashboard. Retrieve the original screws from the old dashboard and use them to mount the new one. Reassemble the panel and secure it with the seven screws. Reconnect the button panel and place it back in its slot. Now do the same with the radio block and secure it with the two screws. Before proceeding, check the radio's functionality. Finally, reinsert the two air vents.
Updated on 4 February 2026 by ScegliAuto
This video is currently unavailable
Related tutorials
Saab 9 3
(2002-2014 /
MK 2)
Using a plastic spatula, detach the climate control console and disconnect the connector by first removing the locking clip. With the aid of two plas…
Saab 9 3
(2002-2014 /
MK 2)
Using a small flathead screwdriver, detach and remove the climate control console by disconnecting the plugs connected to it. Similarly, detach and r…

Saab 9 3
(2002-2014 /
MK 2)
Installing a 2 DIN car radio in the vehicle requires good manual skills and the necessary tools to properly shape the housing for the new radio (give…
Other guides you may be interested in
|
How to Disassemble the Remote Key of a Mercedes C-Class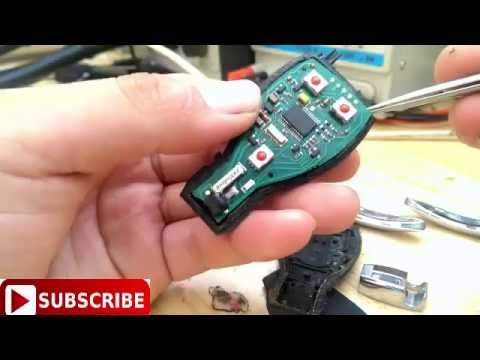
In this video, see how to disassemble the remote key of a Mercedes C-Class. Take your ignition remote and remove the metal key (if present). Insert a lever into the cover slot and press inside. When you hear a click, the cover will be open. Use a small screwdriver to remove the dead battery; take off the side plastics. Separate the cover into two parts and take out the circuit board. Reassemble the new key cover by pressing on the key cover until you hear the locking click (assemble all the pieces). Check that it functions correctly. by ScegliAuto More videos
|
|
For advertising on this site Write to info@scegliauto.com
ScegliAuto is not responsible for any inaccuracy of the data in the lists. To report any inaccuracy or your business (if you own the business in question), please write to info@scegliauto.com
Number of seconds to generate the page: 0.083
(c) ScegliAuto 2026 - info@scegliauto.com - Privacy policy VAT number: IT01247470535 |