
|
Do it yourself
| |||
| ||||


Problem with the gearbox of the Smart 450 solved by replacing the cables
Model: Smart Smart
450
- Years 1998-2007
Let's see the classic problem of the Smart 450 which have the three lines on the dashboard, an unequivocal sign that there are problems with the gearbox, in fact the car does not start. The youtuber replaced the gearbox actuator, then the clutch but with no significant effect. With great patience he then checked all the electrical pins and found some oxidized ones, the very ones that controlled the gearbox of the ECU. By consulting the ECU errors (obviously with an OBD reader, a very useful device for DIY enthusiasts) he was then able to read the ECU errors and discovered that there were broken and unsoldered cables, which must be replaced.
Posted on 28 December 2022 by ScegliAuto
Video tutorial
Related tutorials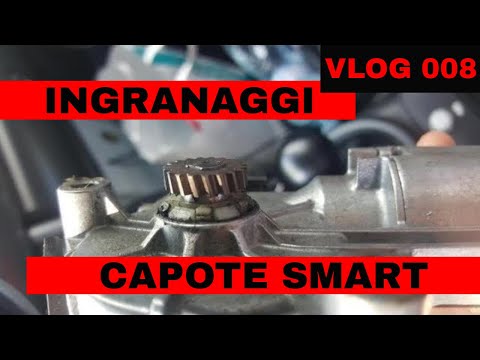
Smart
(1998-2007 /
450)
It often happens that in the closing and / or opening phase of the hood it struggles to reach the end of the stroke and to engage due to wear of the …
Smart
(1998-2007 /
450)
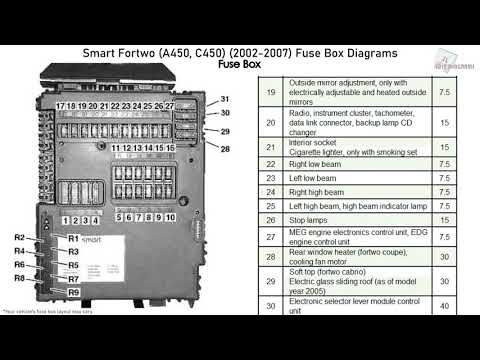
In this video you can see the fuse diagram of the Smart 450 (model from 1998 to 2007). Through these diagrams it is possible to identify the function…
Smart
(1998-2007 /
450)
If your Smart top (we are talking about a Smart 450) no longer moves, by pressing the appropriate button in the passenger compartment, the causes may…
Other guides you may be interested in
|
Frequently Asked QuestionsInstallation of Upgraded Intercooler Radiator with Pipes
Lift the vehicle on suitable axle stands, remove the front wheels, and then the front bumper and grille. Proceed to remove the front headlights; drain the coolant, remove the intercooler radiator and the hoses connecting it to the intake system. Position the new intercooler radiator in the grille, temporarily securing it with cable ties, and mark with a marker the part of the metal that needs to be removed to allow the new hoses to pass through. Cut the marked portion of metal and apply a gasket to the edge. Remove the inner cover of the bumper and position it near the radiator to identify any interfering parts to eliminate: again, apply a gasket to the edge of the cut. Create brackets for securing the new radiator and proceed with the installation of the connecting pipes from the radiator to the intake, shaping and connecting them appropriately. Finally, reassemble the bumper, headlights, and grille. by ScegliAuto More videos
|
|
For advertising on this site Write to info@scegliauto.com
ScegliAuto is not responsible for any inaccuracy of the data in the lists. To report any inaccuracy or your business (if you own the business in question), please write to info@scegliauto.com
Number of seconds to generate the page: 0.051
(c) ScegliAuto 2026 - info@scegliauto.com - Privacy policy VAT number: IT01247470535 |