Do it yourself
Frequently asked questions about cars and motorcycles
  1. Car
  2. :
  3. Fiat
  4. :
  5. Bravo
  6. : Timing belt

Fiat Bravo - Timing belt

Timing Belt Fiat Bravo (2007-2014 / bravo 2)

Fiat Bravo (2007-2014 / Bravo2)
Replacement of the timing belt for the Fiat Bravo 1.9 MultiJet.

The main steps for today will allow us to disassemble and replace the timing belt of the Fiat Bravo 1.9 MultiJet. First, let's raise the vehicle and start by …Read all…
Posted on 15 December 2025 by ScegliAuto
Fiat Bravo (2007-2014 / Bravo2)
How to Replace the Timing Belt on a Fiat Bravo

The replacement of the timing belt on a Fiat Bravo MultiJet vehicle must be carried out based on the condition of the belt and the engine. Generally, it can be …Read all…
Posted on 16 August 2026 by ScegliAuto
Fiat Bravo (2007-2014 / Bravo2)
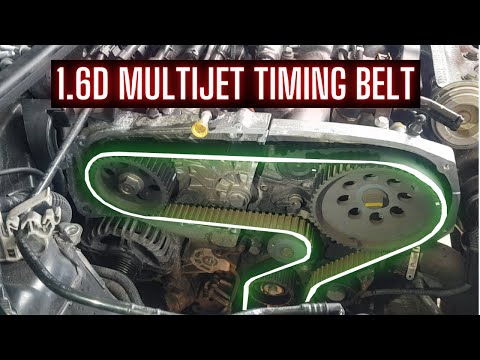
How and When to Replace the Timing Belt on the Fiat Bravo 1.6 MultiJet

In this guide, you will learn how and when to replace the timing belt on the Fiat Bravo 1.6 MultiJet. The timing belt replacement on a small capacity diesel …Read all…
Posted on 1 June 2026 by ScegliAuto

Cigarette lighter (1) Airbag (1) Alternator (1) Speaker (4) Shocks (3) Antenna (2) Car stereo (14) Battery (4) Air vents (1) Control arm (1) Spark plugs (2) Glow plugs (1) Body (1) Control unit (1) Key (1) Timing belt (3) Air conditioner (1) A/C controls (3) Onboard computer (1) Checks and maintenance (7) Dashboard (5) Shifter boot (1) MAF sensor (1) Brake rotors (2) Side marker light (1) Headlight (5) Tail light (5) Fog lights (4) Air filter (8) Cabin air filter (11) Diesel fuel filter (7) Oil filter (4) Parking brake (2) Clutch (1) Grille (3) Light bulb (2) Side marker bulb (1) Headlight bulb (10) Tail light bulb (3) Interior dome light bulb (2) Instrument panel light (2) License plate light (1) (3) Handle (1) Engine (7) Engine oil (4) Clock (6) Door trim panel (7) Front bumper (3) Rear bumper (2) Brake pads (5) Shift knob (4) Instrument cluster (2) Radiator (2) Fuse box (23) Seat (1) Parking sensors (1) Suspension system (2) Side mirror (6) Warning light – error code (7) Service warning light (19) Manufacturer emblem (1) Fuel cap (1) Windshield wipers (4) Turbocharger (1) Valve (1) EGR valve (3) Steering wheel (4)

How to Reset the Tyre Pressure Warning Light on the Opel Mokka?

To reset the tyre pressure warning light on the Opel Mokka, turn on the ignition by inserting the key into the ignition switch. Once the ignition is on, navigate through the menu that appears on the dashboard by pressing the MENU button on the lever to the left of the steering wheel. When the tyre pressure option appears, press and hold the SET/CLR button located on the same lever. This will reset the warning light, and you can then turn off the ignition.

Watch the video!


by ScegliAuto

More videos