
|
Do it yourself
| |||
| ||||



How to Replace the Timing Belt on a Jaguar XF
Model: Jaguar Xf
X260, MK 2
- Years:
2015, 2016, 2017, 2018, 2019, 2020, 2021, 2022, 2023, 2024
Video tutorial
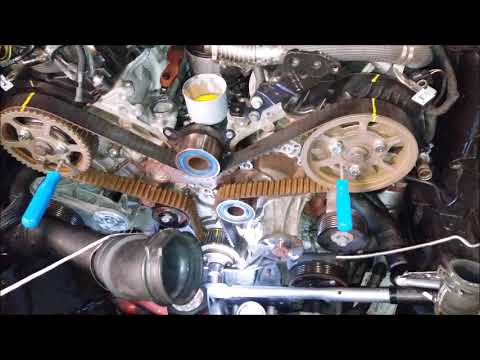
In this video, you will see how to change the timing belt on a Jaguar XF: remove the engine cover and take off the front turbo pipe. The auxiliary belt and tensioner are now accessible. Release the tension on the belt and detach it. Once the lower engine cover is removed, mark the crankshaft and lock the crank to loosen the 22 mm bolt on the pulley cover. Mark the crankshaft pulley as a reference and remove the lower pulley. The pulley fastening device will be tight; remove the two 10 mm screws and the lower cover will lift. Mark the fan belt and the rear plate pulley. The teeth must face upwards on the belt. Mark the bottom to the engine, and the belt to the pulley, as shown in the video. Release the tensioner and unroll the old belt, which can then be removed. The video clearly shows the reference marks left; it is advisable to change the water pump at this time. Now the new belt and tensioner can be fitted; the latter should be left slightly loose. Duplicate the marks on the new belt and reassemble the various parts, turning counterclockwise, and recovering the slack during the run, then tension with the Allen key to remove the pin. Check the alignment of the pointer once aligned. At this point, tighten the tensioner. Now rotate the crankshaft through complete turns and check the timing marks. Ensure that the belt is properly tensioned.
Updated on 26 July 2026 by ScegliAuto
Related tutorials
Jaguar Xf
(2008-2015 /
MK 1)
To replace the timing belt on the Jaguar XF, open the bonnet to access the components located in the engine bay: at the front of the engine block, yo…
Jaguar Xf
(2008-2015 /
MK 1)
Before starting, open the bonnet of your Jaguar XF. Begin by removing the engine cover. Next, disassemble and remove the entire air filter assembly a…

Jaguar Xf
(2008-2015 /
MK 1)
To replace the timing chain on the Jaguar XF, it is advisable to completely remove the engine from its housing: to do this, loosen all the screws tha…
Other guides you may be interested in
|
How to Remove the Toll Tag Holder from the Car Windscreen
The toll tag holder is usually attached to the car windscreen to ensure that the toll tag functions immediately when passing through barriers. However, if you decide to remove the holder, you should follow this procedure: - Insert the toll tag into the holder; - Pull the holder inwards to detach it from the windscreen; you can use a glass scraper or a stiff plastic card to assist you; After removing the holder, it is essential to remove the adhesive from the windscreen. To remove the adhesive, we recommend using a solvent-based spray that will remove the glue without clouding the area. by ScegliAuto More videos
|
|
For advertising on this site Write to info@scegliauto.com
ScegliAuto is not responsible for any inaccuracy of the data in the lists. To report any inaccuracy or your business (if you own the business in question), please write to info@scegliauto.com
Number of seconds to generate the page: 0.131
(c) ScegliAuto 2026 - info@scegliauto.com - Privacy policy VAT number: IT01247470535 |
