
|
Do it yourself
| |||
| ||||


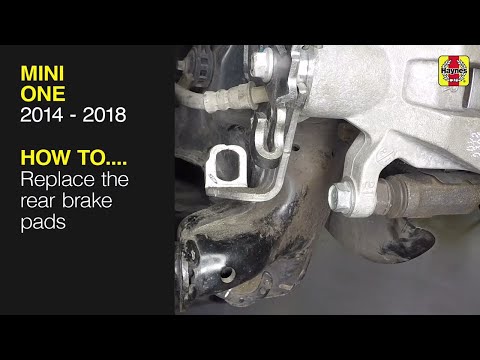
Replacement of the rear brake pads of the Mini.
Model: Mini Mini
R53, R50, R52
- Years 2001-2007
To replace the rear brake pads of the Mini, we start by opening the engine hood and unscrewing the cap of the brake fluid reservoir. We loosen the wheel nuts, lift the car with a lifting bridge, and finish unscrewing the nuts, removing the wheel. Using a lever, we separate the brake pads from the disc, remove the protections, and unscrew the nuts to remove the brake caliper. With a lever, we remove the retaining spring, remove the caliper, and secure it to the shock absorber. We remove the old brake pads, clean the work areas using a wire brush and a specific spray, use a piston retractor to bring the caliper piston back into place, spread a little anti-friction paste on the pad seat, and install a new pair. We reassemble the caliper and tighten it with a torque wrench to 30Nm, reinstall the retaining spring and dust caps, clean the brake caliper carrier and apply a thin layer of copper paste before reinstalling the wheel, tightening it with a torque of 110Nm. We repeat the process with the other wheel.
Posted on 18 September 2023 by ScegliAuto
Video tutorial
Related tutorials
Mini
(2007-2014 /
R55, R57, R56)
Let's see the process of disassembling and replacing the rear brake pads of the Mini Cooper, in simple steps. First, lift the car, even just on the r…

Mini
(2010-2016 /
R60, Countryman1)
Briefly, we will see the step-by-step instructions for disassembling and replacing the rear brake pads of the Mini Countryman, in simple steps. First…
Mini
(2014-2023 /
F55, F56, F57, F54)
In today's video tutorial we will see how to remove and replace the rear brake pads on the Mini Cooper One F55, in simple and quick steps. First we l…
Other guides you may be interested in
|
How to Install the Original Car Radio in a Mitsubishi Colt
How to install the original car radio in a Mitsubishi Colt? This video carefully shows how to disassemble and reassemble it. Unscrew the screws on the central dashboard using a screwdriver as shown in the video, then, using a plastic or metal lever, pry off the central trim of the dashboard. Remove the frame from the dashboard, and take out the plastic glove compartment along with the trim. Unscrew the retaining screws around the car radio, remove the stereo from the dashboard (disconnecting the various power cables). Finally, reassemble the car radio in the dashboard as it was disassembled earlier. by ScegliAuto More videos
|
|
For advertising on this site Write to info@scegliauto.com
ScegliAuto is not responsible for any inaccuracy of the data in the lists. To report any inaccuracy or your business (if you own the business in question), please write to info@scegliauto.com
Number of seconds to generate the page: 0.076
(c) ScegliAuto 2026 - info@scegliauto.com - Privacy policy VAT number: IT01247470535 |