
|
Do it yourself
| |||
| ||||


How to keep track of the maintenance status of our Mini
Model: Mini Mini
F66
- Years 2023-2026
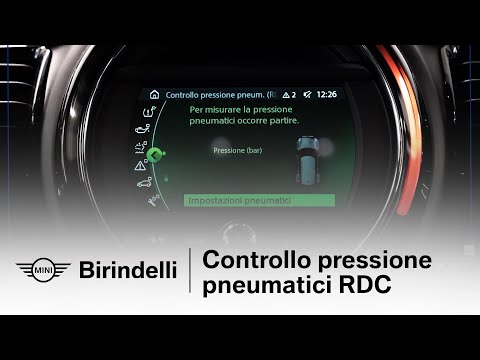
Let's see how to monitor the maintenance status of our Mini from the on-board computer: from the multimedia screen we select "vehicle info" and then click on "status" or "maintenance" and enter the control function. Here we find the mileage deadlines, that is, the kilometers remaining until the next service; the time deadlines for the next inspection. If the indicator is green, then Ok, everything is in order. Also, to check the fluid levels, I can rely on the sensors that will indicate the engine oil level, brake fluid status, windshield washer fluid level, and coolant level. If the light is green everything is fine and the levels are normal. If it is yellow the next deadline is approaching and checking is recommended. Red: the deadline has passed and/or the fluid levels are critical or a fault is detected. With the same system, we also check the battery status, brake wear, tire pressure, and inspection deadlines. With this system, we cannot check the power steering fluid, transmission fluid, and brake fluid separately.
Posted on 10 November 2025 by ScegliAuto
Video tutorial
Related tutorials
Mini
(2010-2016 /
R60, Countryman1)
If our Mini Countryman doesn't start and displays an error message that says "keep the remote control on the steering column", the car would start in…

Mini
(2014-2023 /
F55, F56, F57, F54)
Let's see how to access the maintenance menu of a Mini F56 equipped with the iDrive infotainment system. Turn on the ignition, and in the center of t…
Mini
(2017-2023 /
F60, Countryman2)
In today's video, we will see how to reset the RDC system (which is related to tire pressure control) in the Mini. F55, F56, F57, and F60 are the fou…
Other guides you may be interested in
|
How to Replace the Front Headlamp Bulb on a Citroen DS3
Prepare the necessary tools as indicated in the video and then proceed to release the bonnet from the designated lever and lift it to secure it with the appropriate prop. Now locate the back of the headlamp to remove the protective cover that covers each individual bulb position. Then extract the bulb in question and disconnect it from the connector. Install the new bulb, and you're done. Of course, repeat the operations for each bulb that needs replacing, then retrace the steps described for reassembling the various components. by ScegliAuto More videos
|

|
For advertising on this site Write to info@scegliauto.com
ScegliAuto is not responsible for any inaccuracy of the data in the lists. To report any inaccuracy or your business (if you own the business in question), please write to info@scegliauto.com
Number of seconds to generate the page: 0.125
(c) ScegliAuto 2026 - info@scegliauto.com - Privacy policy VAT number: IT01247470535 |