
|
Do it yourself
| |||
| ||||


Replacing the Door Central Locking Mechanism
Model: BMW Serie 3
E46
- Years 1998-2006
I will explain how to replace the central locking mechanism of your car. First, gather Phillips screwdrivers, Torx keys, and a trim removal tool kit. Disconnect the battery of your car to work safely! After that, let's start removing the door panel by unscrewing the Phillips screws located under the armrest. Use the trim removal kit to detach the clips on your door. After removing the airbag clips, you will find a Phillips screw; remove it, and then detach the panel, but not completely, as you need to disconnect all the connectors first. Once everything is disconnected, remove the panel. Now, you will need to disassemble the window regulator mechanism and also remove the glass for easier access later. After removing the glass and the window regulator, use a Torx key to remove the screw located in the left hole of the door that holds the lock cylinder, and then the three screws that secure the door lock, being careful with the connector that you need to disconnect. Now, get the new replacement part and reassemble everything in reverse order, and your job will be complete.
Updated on 26 February 2026 by ScegliAuto
Video tutorial
Related tutorials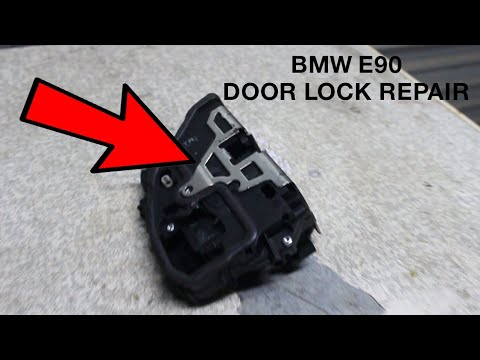
BMW Serie 3
(2005-2013 /
E92, E90, E91)
Let's see how to disassemble the central locking of a BMW 3 Series E90, following these simple instructions. First we open the front door and we go t…

BMW Serie 3
(2005-2013 /
E92, E90, E91)
The inability to open and close the central locking of one's car is often caused by a dead key battery or a broken remote control. However, this may …

BMW Serie 3
(2005-2013 /
E92, E90, E91)
Today we will learn how to program the remote control key of the BMW 3 Series. First, get into the car with the remote control and insert it into the…
Other guides you may be interested in
|
How to Replace the Rear Indicator Bulb on an Audi A3
Position the car on a ramp or flat surface and immobilise it. Now, open the boot lid and, inside, corresponding to the rear light where you want to replace the indicator bulb, remove the small plastic cover using a screwdriver. Inside the hole, you will find a bolt (to be removed with a flat screwdriver); once this is undone, you can remove the entire rear light assembly. After this, proceed to remove the part inside the light assembly by unscrewing the 2 small bolts, as shown in the images. In the part you just removed, all the bulbs of the light are mounted. To replace them, simply remove them from their sockets and fit the new ones. To reassemble the entire unit, repeat all the steps shown in the images in reverse order. by ScegliAuto More videos
|
|
For advertising on this site Write to info@scegliauto.com
ScegliAuto is not responsible for any inaccuracy of the data in the lists. To report any inaccuracy or your business (if you own the business in question), please write to info@scegliauto.com
Number of seconds to generate the page: 0.201
(c) ScegliAuto 2026 - info@scegliauto.com - Privacy policy VAT number: IT01247470535 |