
|
Do it yourself
| |||
| ||||


How to replace the spark plugs on the Fiat Bravo 1.6 Multijet
Model: Fiat Bravo
Bravo 2
- Years 2007-2014
It may happen that an ignition plug burns out and the warning light on the dashboard starts to come on. Replacement can be simple but there are cases in which extraction can be difficult and a mechanic must be used to avoid damage. If you want to do it yourself, let's get the new glow plugs and the socket insert suitable for their assembly. On the rear side of the engine we are going to identify the connections of the control cables of the glow plugs and disconnect them with the help of pliers. Now, with the socket wrench we go to unscrew a glow plug counterclockwise. Let's go carefully to extract it and replace it with the new one. Let's tighten it by hand until it stops with the extension and then let's go and tighten it with the torque wrench; the tightening torque is recommended by the manufacturer of the glow plugs. We then insert the electric cable of the glow plug and proceed with the replacement of the remaining ones.
Posted on 4 July 2022 by ScegliAuto
Video tutorial
Related tutorials
Fiat Bravo
(2007-2014 /
Bravo 2)
In this video we can see how to change the glow plugs on a Fiat Bravo 2 MultiJet (but the procedure is the same for Alfa Romeo 147/156; Lancia Lybra …

Fiat Bravo
(2007-2014 /
Bravo 2)
Below we will discover the steps that will allow us to disassemble and replace the diesel filter of the Fiat Bravo 1.6 MultiJet. First, we open the h…

Fiat Bravo
(2007-2014 /
Bravo 2)
The main steps for today will allow us to disassemble and replace the timing belt of the Fiat Bravo 1.9 MultiJet. First, let's raise the vehicle and …
Other guides you may be interested in
|
How to Replace the Rear Door Lock on an Audi A4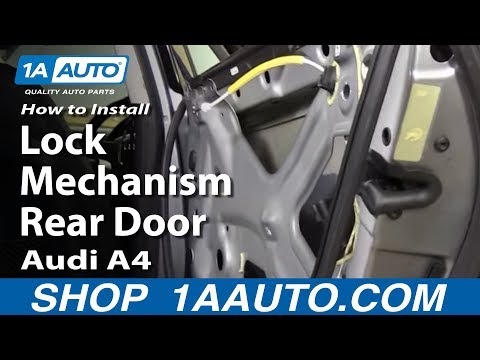
First, disconnect the negative cable from the battery. Now, open the door in question and lift the chrome strip at the top. Then, remove all the screws indicated in the video. You can now lift the door panel by pulling it towards you. Disconnect the connectors at the back and remove the panel. Next, you will need to remove the components shown in the video. Also, detach the weatherstrip around the door and the protective sheet. You will also need to remove the window glass by disconnecting all the connectors and bolts. Then, replace the damaged part and retrace the steps described in reverse. by ScegliAuto More videos
|

|
For advertising on this site Write to info@scegliauto.com
ScegliAuto is not responsible for any inaccuracy of the data in the lists. To report any inaccuracy or your business (if you own the business in question), please write to info@scegliauto.com
Number of seconds to generate the page: 0.099
(c) ScegliAuto 2026 - info@scegliauto.com - Privacy policy VAT number: IT01247470535 |