
|
Do it yourself
| |||
| ||||


Hyundai I10 - Tail light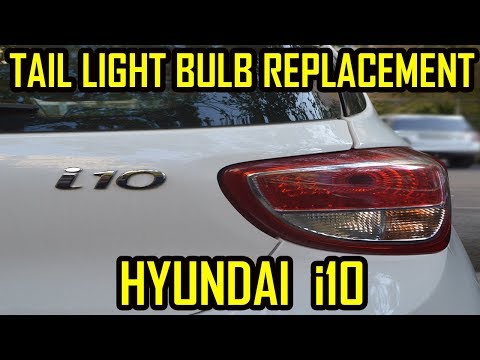 Hyundai I10 (2013-2020 / IA, MK 2)
How to disassemble the rear light and the bulb of the Hyundai I10 In this short guide, we will see the instructions necessary to disassemble and replace the rear light and its bulbs of the Hyundai I10, by following these …read all… Posted on 15 December 2022 by ScegliAuto 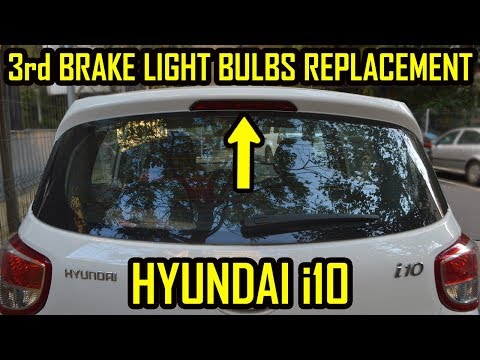 Hyundai I10 (2013-2020 / IA, MK 2)
Hyundai i10 third stop removal In this short video tutorial we will see the instructions on how to remove the third stop and how to replace the relative bulbs of a Hyundai i10 second series, …read all… Posted on 13 February 2024 by ScegliAuto 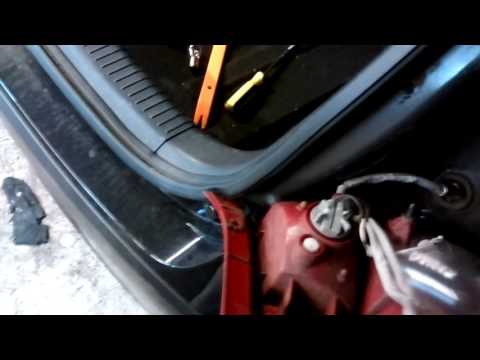 Hyundai I10 (2007-2013 / PA, MK 1)
How to replace the headlight bulb on a Yundai I10 Replace damaged rear light bulbs? Let's see the disassembly. We open the hood of the luggage compartment, then, we unscrew the tightening screws on the side of …read all… Posted on 23 December 2023 by ScegliAuto 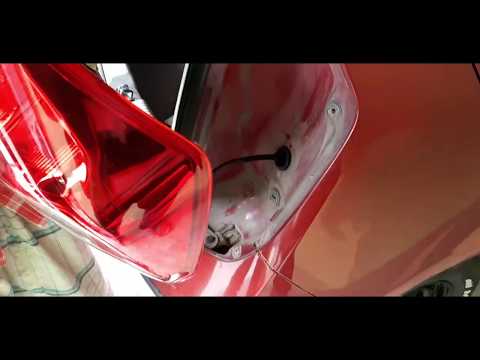 Hyundai I10 (2007-2013 / PA, MK 1)
How to remove the rear light on Hyundai I10 We disassemble the rear light of the car if we want to replace it or replace the bulbs inside it. Lift the tailgate of the luggage compartment, unscrew the …read all… Posted on 21 December 2023 by ScegliAuto Antenna (1) Car stereo (6) Battery (3) Spark plugs (6) Key (6) Timing belt (9) V-belt (1) -board computer (7) Checks and maintenance (32) Throttle body (1) Dashboard (1) Gearshift gaiter (2) Side indicator light (1) Headlight (9) Tail light (4) Fog lights (1) Air filter (1) Cabin air filter (4) Petrol filter (1) Clutch (1) Window lift switch (1) Light bulb (3) Headlight bulb (9) Interior lights ceiling light bulb (1) Starter motor (1) Gear oil (1) Door panel (3) Front bumper (1) Rear bumper (1) Brake pads (1) Tires (3) Gear Shift Knob (1) Pump (1) Fuel pump (2) Instrument cluster (11) Radiator (1) Fuse box (2) Outside rearview mirror (1) Thermostat (2) |
Handbrake adjustment on Ford Ecosport
First remove the plastic profile at the base of the gear lever. To do this, slightly widen the side edges and carefully lift it to release it. There is no need to remove it completely, just move it forward to avoid bother. Now remove the plastic center console around the handbrake by first working from the rear to release it and lifting it until the brake lever passes. Also in this case it is not necessary to remove it completely but, paying attention to the connected cables, it can be stowed in front of the passenger seat. At this point we notice that at the base of the handbrake lever, on the front, we find a nut. By acting on it, with a 10 wrench, we can adjust the brake force, increasing it by turning the nut clockwise, or decreasing it by turning it counterclockwise. Once adjusted, the center console can be repositioned first, pressing lightly to engage it, and then the profile of the gearbox base. by ScegliAuto More videos
|
|
For advertising on this site Write to info@scegliauto.com
ScegliAuto is not responsible for any inaccuracy of the data in the lists. To report any inaccuracy or your business (if you own the business in question), please write to info@scegliauto.com
Number of seconds to generate the page: 0.007
(c) ScegliAuto 2024 - info@scegliauto.com - Privacy Policy VAT number: IT01247470535 |